Are you searching for the best hammer drill and not having much success? More and more DIY enthusiasts and homeowners are buying drill or rotary hammers as they’ve come to recognize its many benefits.
Maybe you’re interested in getting one, or wondering if such a tool is necessary. Should you get one or are you better off with other tools?
That’s where my guide can help as I’ve reviewed the top 10 hammer drills you can purchase today. If you have questions about hammer drills, how they work and what to buy, this guide can be of assistance to you.
Top 10 Hammer Drill Comparison and Ratings
 To help you decide what the best corded hammer drill is, I have prepared this comparison table. As you can see, I picked the DeWalt DW511, the Makita XPH102, and the Bosch 11255VSR.
For more details about their features and specs, check the reviews. Whichever of the three picks you choose, you will get value for your money.
Note: while batteries are not included with some hammer drills, they can be purchased online. All of these hammer drills are also certified to work with different materials.
Top 3 Selections
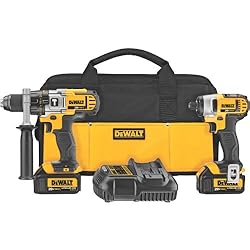
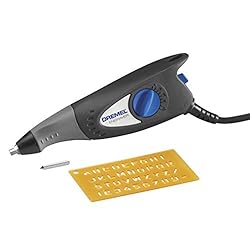
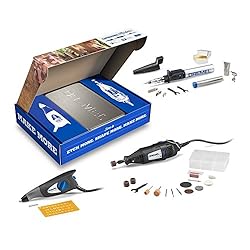
DeWalt DW511 1/2″
 7.8 Amp VSR Hammerdrill") I pick the DeWalt DW511 1/2″, as it has all the essential features you may need in a hammer drill. If you’re looking for a hammer drill with a powerful motor that’s versatile and easy to use, the DW511 is your best choice.
I pick the DeWalt DW511 1/2″, as it has all the essential features you may need in a hammer drill. If you’re looking for a hammer drill with a powerful motor that’s versatile and easy to use, the DW511 is your best choice.
DeWalt makes a lot of quality tools, and this is one of their best. It is also one of the most versatile.
Best Value for the Money
Makita XPH102 The Makita XPH102 has a powerful motor and safety features that make it ideal for users of all levels. It is also compact so you won’t have difficulty using the tool.
This is hard to match in terms of overall bang for the buck. For beginners and long time DIY enthusiasts, this is a good choice.
Best Budget Model
Bosch 11255VSR

The Bosch 11255VSR is not the cheapest of the budget hammer drills, but you will get a lot out of it performance wise. Its combination of power, quality and reliability make it a good choice for DIY buffs.
Bosch is known for their high-quality power tools, and the 11255VSR is certainly one of the best. In terms of features and flexibility, this one is as good as it gets.
Why Do You Need a Hammer Drill?
The best cordless hammer drill is capable of performing many tasks such as the following.
- Hammer drills can perform driving and drilling tasks
- Hammer drills can be used for masonry projects
- Makes boring holes quick
- Electricians, carpenters and builders rely on hammer drills to block and brick walls. These are also used in electrical box installation.
- Useful when working on cabinets and shelves
- Hammer drills have more power than regular drills, which makes it more suitable for heavy duty tasks.
- Hammer drills are suitable for drilling in stone and concrete
- Hammer drills are also ideal when you’re working with wall plugs, concrete screws and anchor bolts.
- These rotary tools are also preferable for working on materials with unknown properties owing to their power.
- You can use a hammer drill to connect wood studs to an electrical box or a similar application.
- Many of these hammer drills have a clutch that gives them extra power. You will find this useful in tasks that require a lot of power.
- A lot of these hammer drills can also be used for chipping tasks and other small work.
- Hammer drills are perfect for DIY tasks and even large projects.
Best Picks of Hammer Drill
Here are my best rotary hammer drill reviews. We will look at their most important features as well as the pros and cons.
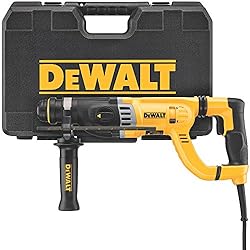
#1.DeWalt DW511 1/2″ (13mm) 7.8 Amp VSR Hammerdrill
 The DW511 is more than a match with the best SDS hammer drill available. Its dual mode lets you use the DW511 on steel, masonry, concrete or wood, giving you lots of flexibility.
The DW511 has a 7.8 amp motor that gives it up to 650 watts, and with masonry can go from 0 to 46,000 BPM. With this kind of power you’ll be able to work more quickly and efficiently.
The DW511 hammer drill has overload protection so you can use it with confidence. It also has variable speed so you can work with the accuracy needed for a specific task.
The hammer mode allows you to break into tough materials with burning or damaging the bit. Whether it is concrete, steel or wood, the DW511 performs consistently.
The DW511 drilling capacity is 1/2-inches, while its wood capacity is good up to 1-1/4-inches. If you opt for concrete mode, the range is from 5/32- to 3/8-inches.
The hammer drill has a 2-finger rubber trigger so you’ll feel comfortable using it. The trigger also simplifies speed control adjustment.
The side handle’s 360 degree design lets you positon your hand in the area that you’re most comfortable with. It also has a depth rod so you can work with precision.
The hammer drill weighs only 4.3 lbs. so you won’t tire while using it. Performance wise, it is quick and efficient, just what you need.
What I Like
- Very reliable motor allows for continuous use
- Provides precision performance
- Lightweight and easy to move around
- Dual mode available for use with different materials
What I Didn’t Like
- Does not include a bag
- Can get hot with prolonged use
Bottom Line
The DW511 is one of the best home cordless drill products the company has made, combining power, ease of use and performance. For home improvement and projects that demand precision, the DW511 will get the job done.
Click Here To Find The Best Price Today
#2.Makita XPH102 18V LXT Lithium-Ion Cordless 1/2″ Hammer Driver-Drill Kit (3.0Ah)
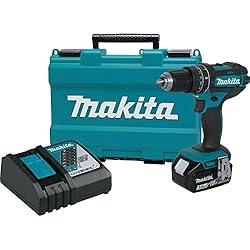
If you’re looking for the best hammer drill for the money, the XPH102 is as good a candidate as any. It is equipped with a four-pole motor and up to 480 in. lb. torque, more than the typical hammer drill provides.
At just 3.9 lbs. the XPH102 is one of the lightest hammer drills around. Even if you use this for long stretches, the ergonomic design keeps your hand comfortable.
The XPH102 variable speed range is from 0-600 & 0-1,900 RPM and 0-9,000 & 0-28,500 BPM. With this kind of power and flexibility, you’ll be able to do a lot of driving, hammering and drilling.
Its extreme protection technology (XPT) technology makes the XPH102 resistant to water and dust. If you work in harsh conditions, this is the type of hammer drill you’ll need.
The XPH102 has LED lights built in so you can continue working in low lit environments. The all metal design also gives it the durability required for long term use.
The belt clip is reversible and can be connected to either side, and it has Star Protection Computer Controls to prevent overheating, over-discharging and overloading.
The XPH102 comes in three types: one with the driver drill, a driver drill with a 70 piece set and a 38 piece set with holder. All models have a 3 year warranty.
What I Like
- Versatile and reliable performance
- Ergonomic design makes handling convenient
- Can be used for hammering, driving and drilling
- LED lights illuminate the area you work on
What I Didn’t Like
- Does not come with an extra battery
- The light cannot be turned off
Bottom Line
Rotary hammer drills reviews have given the XPH102 solid feedback, and it’s easy to see why. The XPH102 is suitable for home improvement DIY projects, and it doesn’t compromise performance with size and comfort.
Click Here To Find The Best Price Today
#3.Bosch 11255VSR BULLDOG Xtreme 1-Inch SDS-plus D-Handle Rotary Hammer
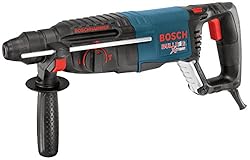 The 11255VSR has the features you would expect in top rated hammer drills. Chief among these is its 7.5 amp motor that provides up to 0 – 1,300 RPM and 0 – 5,800 BPM, sufficient for heavy duty work.
The 11255VSR variable speed trigger has a reverse, making it easy to remove fasteners. It also has a proprietary 35 degree pivot cord that leads to longer life and greater flexibility.
The 11255VSR also has a D-handle design for maximum control. This also makes it easy to do downward and overhead drilling.
It has a multifunction selector for hammer only, rotary hammer and rotary only mode. With its SDS Plus bit system, you can change bits without using tools.
The same SDS Plus design allows for optimum energy impact and auto bit locking, and its Vario Lock lets you position the bit precisely where it needs to be.
Its combination of 0-1300 RPM; 0-5800 BPM and 7.5 amps means you get impact energy up to 2.0 ft./lbs. It multi-mode options add to its flexibility, and its integral clutch activates torque disengagement if there’s jamming.
This hammer drill carries enough power for most masonry drilling, and you should have an easy time using it for most home improvement tasks.
Whether you need to work on your patio or furniture, the 11255VSR should work fine.
What I Like
- Bit changes are tool free
- Variable speed has reverse capabilities
- Easy to use and learning curve is slight
- Allows for multiple bit positions
What I Didn’t Like
- Not suitable for reinforced concrete
- The storage case doesn’t provide a lot of space for drill bits
Bottom Line
Small hammer drills often lack punch, but the 11255VSR is an exception as it combines power with precision. With its powerful motor, variable speed and multiple modes, the 11255VSR makes for an excellent all-around hammer drill.
Click Here To Find The Best Price Today
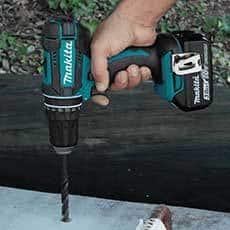
#4.DEWALT DCD996B Bare Tool 20V MAX XR Lithium Ion Brushless 3-Speed Hammer Drill
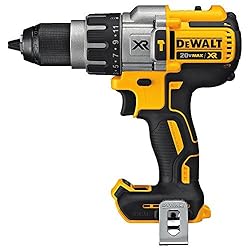 The DCD996B is equipped with a high powered brushless motor that provides up to 60% extra runtime. It also has high powered transmission for more effective results.
The DCD996B has speeds of 2,250 RPM, 0-38, 250 BPM, which gives it an extra run time of 2.8 times. It is also 80% more powerful than other hammer drills so you can do a lot more work.
The DCD996B goes up to 820 watts out so application speed is faster. The hammer drill chucks are nitro-carburized metal, giving it extra durability that units don’t have.
The best hammer drill for concrete has sealed and coated switches that make it resistant to contamination and moisture. These features also make the DCD996B perfect for rough working conditions.
Its 3-mode LED lighting includes a mode for spotlight so you can work even in low light environments. Thanks to its three-speed design and durable transmission, you get consistent runtime and rapid application speeds.
This hammer drill also comes with carbide inserts for stronger grips. Going back to the LED, its illumination is 20 times brighter than previous versions, and the LED spotlight has an auto shutdown function in case you forget.
There are a lot of quality non-corded hammer drills, but the DCD996B is one of the most versatile when it comes to fastening, drilling and driving. Its torque power is also top of the line.
What I Like
- LED light provides plenty of illumination
- Drills masonry quickly and without making a mess
- Runtime improved over previous models
- Lightweight and compact
What I Didn’t Like
- Batteries not included
- Speed selector gets stuck sometimes
Bottom Line
Ask who makes the best drill and many will say it’s DeWalt, and the DCD996B one of those reasons. Its combination of high performance and reliability makes this an appropriate choice for DIY buffs and the occasional builder.
Click Here To Find The Best Price Today
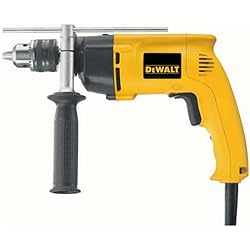
#5.PORTER-CABLE PC70THD VSR 2-Speed Hammer Drill, 1/2-Inch
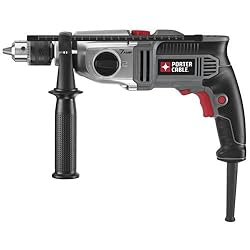
The PC70THD is one of the best corded drill under $100 as it packs power and ease of use. It is powered by a 7.0 amp motor so it can handle blocks, bricks, concrete, wood and metal.
The PC70THD has a side handle so you always have control while working. With this feature you now have a firmer grip even with heavy tasks.
The 2-finger locking mechanism simplifies use even for prolonged periods. And with its dual speed transmission (0-1,100 & 0-3,100), you get optimum speed and torque.
For all its features, the PC70THD is easy to use. With a single switch you can set the PC70THD for drill or hammer drill mode.
The quality extends to the cast metal used for its casing that leads to heat dissipation, and it also provides extra durability. The PC70THD also has dual transmission speed for maximum speed and torque.
The molded body is streamlined to prevent fatigue and increase comfort. Combine this with the side handle and you have a powerful and easy to use hammer drill.
A ½ inch chuck and key ensures there is sufficient pressure for better retention of bits. With the PC70THD you can perform a wide range of tasks on plastic, wood, metal and other materials.
This hammer drill has a 3 year limited warranty. It also has an easy to adjust variable speed switch.
What I Like
- Built for use for long term use
- Durable and ergonomic design
- Gives you plenty of control
- Works well with different materials
What I Didn’t Like
- Ideal for light and medium duty use
- Motor can get quite hot
Bottom Line
If you’re searching for the best cordless drill under $100, the PC70THD should be on your wish list. With its 7.0 amp motor, this hammer drill provides you with the durability and power necessary in many drilling tasks.
Click Here To Find The Best Price Today
#6.DEWALT D25263K D-Handle SDS Rotary Hammer with Shocks, 1-1/8
 Ask the question what is the best hammer drill and odds are the D25263K will be among those mentioned. This is no surprise given its 8.5 amp motor, which is more powerful than the typical consumer hammer drill.
The D25263K provides an energy impact of 3 joules and it has a rotating brush that offers maximum torque and speed forward and reverse.
There is an integral clutch that minimizes sudden high torque, and it has protection against vibration, which is a common problem with hammer drills.
The high impact energy allows the D25263K to chip and drill quickly. When this is combined with the high amp motor, you get a powerful hammer drill.
One of the most important features on the D25263K is SHOCKS, which gives it extra regulation and control over vibration. With its Protect and Perform feature, the D25263K will last a long time.
The features give the D25263K an advantage over low powered hammer drills, and it has enough power to go through bricks and concrete foundation walls. It doesn’t take long to create holes either.
The D25263K ergonomic design means you won’t feel pressure or vibration while using it. Since it’s very fast, you don’t have to spend a lot of time using it.
The package includes the kit box, depth rod, 360 side handle and the hammer drill.
What I Like
- Provides full torque and speed reverse and forward
- Integral clutch does a good job reducing high torque
- Powerful motor
- Consistent performance
What I Didn’t Like
- Made in China
- Does not have a belt hook
Bottom Line
The D25263K is a high end hammer drill that provides more power than the typical model. If you need a hammer drill with more power, speed and impact energy, then you may want to take a look at the D25263K.
Click Here To Find The Best Price Today
#7.DEWALT DCK290L2 20-Volt MAX Li-Ion 3.0 Ah Hammer Drill and Impact Driver Combo Kit
 Those who know how to use a hammer drill will agree that sometimes you just need more power. With its 0-575; 0-1,350; and 0-2,000 RPM speeds, the DCK290L2 definitely lives up to the task.
Both impact driver and hammer drill are built for long term use in rugged jobsites. The half inch hammer drill is equipped with a 535 unit watt motor for light and medium duty projects.
A 1/2-inch ratcheting chuck is included, and the carbide inserts enhance functionality. The highlight here is the aforementioned 3-speed transmission, which lets you choose the right speed for the job.
Not only is the DCK290L2 fast, but it is also 30% more efficient than the standard hammer drills out there.
The impact driver is powered by a 2800 rpm motor, making it 43% than most other drivers available. The impact driver works with one inch bits, and the chuck makes it easy to work in tight spots.
The DCK290L2 impact driver is compact, easy to use and does not produce the reactionary torque that other impact drivers do. The DCK290L2 impact driver is also compact and ergonomic.
Both the hammer drill and impact driver have been optimized for maximum performance. Even with extended use, both hammer drill and impact driver are protected from overheating and overloading.
Both tools run on lithium-ion batteries, giving them more power than typical tools.
What I Like
- Works great for metal and plastic
- LED lights simplify your work
- Very quick application speed
- Lots of drilling power
What I Didn’t Like
- Drill chuck wobbles if not properly set up
- Batteries are a little hard to fit
Bottom Line
If the standard hammer drill does not cut it for you, the DCK290L2 probably will. Its speed, flexibility and power makes this superior to most impact driver and hammer drill kits in the market.
Click Here To Find The Best Price Today
#8.Ryobi ZRD620H 6.2 Amp 5/8 in. VSR Hammer Drill
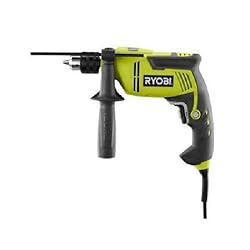 Ryobi belongs to any list of the best drill brand as their products are high quality. The ZRD620H is one of those thanks to its 6.2 amp motor that can handle light and medium duty jobs without difficulty.
With its hammer mode you can use the ZRD620H to drill holes in concrete and masonry. It also has a keyed chuck provides superior bit retention.
The ZRD620H has an auxiliary handle for better balance and handling, crucial when your project needs precision. The motor gears are metal, and combined with the ½ inch keyed chuck gives it extra flexibility.
The ZRD620H has a slide button on the top so you can choose the drill or hammer function. Whichever function you use, the unit’s handle makes holding easy.
There is a lock on trigger button makes the ZRD620H ideal for continuous use. It also has a GripZone so you’re always comfortable holding it.
The depth gauge on the handle makes it more convenient to use, and the 6 ft. cord gives you plenty of room to maneuver.
The hammer mode is adequate for use in concrete and masonry. The drill mode is well suited for metal, plastic and other materials.
I also have to add the inclusion of the chuck key storage is a plus because it reduces the possibility of misplacing the chuck.
What I Like
- Convenient to use
- The chuck is built for heavy duty application
- Drills quickly
- Variable speed dial allows for precision work
What I Didn’t Like
- Not suitable for very deep concrete holes
- Hammer action not very strong
Bottom Line
The ZRD620H is a handy hammer drill for small jobs and the occasional user who may need to do some patch up job here and there. If you don’t need a powerful hammer drill, the ZRD620H should satisfy your requirements.
Click Here To Find The Best Price Today
#9.Bosch RH328VC 1-1/8-Inch SDS Rotary Hammer
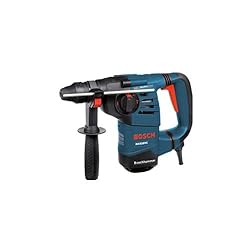 The best drill for home doesn’t have to be low powered. With the RH328VC you get 2.6 ft-lbs. impact energy and an 8 amp motor for extra drilling and hammering power.
The RH328VC has vibration control built in the hammer. This feature and the grip gives makes handling comfortable even with long use.
There are three operation modes, rotation only, hammer only and rotary hammer. It is very easy to switch from one mode to the next, boosting your productivity.
All good hammer drills have an integral clutch and the RH328VC is no exception. With this clutch there’s very little chance of high torque reaction.
The RH328VC has a variable speed 3-finger so bit starting is more accurate. This feature also gives you superior control over operations.
At just 12 ½ inches long, the RH328VC provides you with a solid size to power ratio. With its 8 amp motor, the RH328VC produces up to 4,000 a minute.
No matter what mode you’re in, the hammer drill keeps vibration to a minimum. It also has a Vario Lock so you can position the chisel in a dozen different ways.
Its vibration control mechanism works in the grip and mechanism area. The procedure begins from impact mechanism and works towards the handle.
In addition, there is a rubber dampener so it is comfortable to use. The 360 degree rotation on the handle and the grip padding add to your comfort level.
The RH328VC has a one year limited warranty.
What I Like
- Excellent weight to power ratio
- Easy to operate
- Selector makes it easy to switch modes
- Very good vibration control
What I Didn’t Like
- Not suitable for wood drilling
- Cannot work with 4 inch core drill bits
Bottom Line
The RH328VC is the kind of hammer drill you will need if you need a lot of power. Its chuck capacity, BPM and features let you get more work done in shorter periods.
Click Here To Find The Best Price Today
#10.Pink Power PP182 18V Cordless Pink Drill Set for Women- Tool Case, 18 Volt Drill, Charger and 2 Batteries
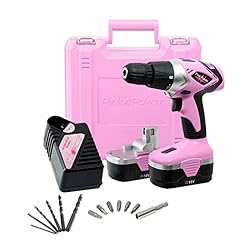 The PP182 is one of the best battery-powered drills in its range. It offers variable speed so you can be accurate with the drilling.
The PP182 has a keyless chuck and 0-550RPM motor for extra power. There are 16 settings for torque so you can use the exact speed needed for the task.
The unit weighs just 3 pounds so there’s very little pressure when you work. It also has a magnetic base and bubble level so your drilling is always accurate.
Even though the PP182 is light, it does not compromise when it comes to power and flexibility. This model has been upgraded from the previous ones and is now stronger.
The LED also goes up automatically when you hold the trigger. With this feature, you can complete your projects even if the lighting isn’t that good.
Because the unit has a magnetic base, you will be able to put bits and screws on the PP182.
The product comes with a one year warranty. The batteries, charger and other components are all included in the kit.
This hammer drill also has a reverse function feature. Just press the button atop the trigger and you can use it in reverse.
The PP182 is not the most powerful hammer drill, but for most tasks this will work. Since not everyone needs a heavy duty hammer drill, the PP182 is a good alternative.
What I Like
- LED light lets you work in the dark
- Bubble level enhances leveling
- Kit comes with all the tools to operate the hammer drill
- Less than 3 pounds
What I Didn’t Like
- For light and medium duty use only
- Bits cannot be used on metal
Bottom Line
The PP182 is not just for women, but for anyone needs a high quality but affordable hammer drill. It doesn’t have the power of other hammer drills, but for light duty work the PP182 is sufficient.
Click Here To Find The Best Price Today
How to Choose the Best Hammer Drill
Hammer drills are either corded or cordless:
- Cordless: the best cordless tools for contractors are compact and flexible, ideal for light jobs and home use.
- Corded: corded hammer drills have more power, but your movement is limited to the length of the cord.
Hole Diameter
Determine the diameter of the holes you’ll be drilling in masonry or concrete. These tools work within specific ranges, but they can be modified to work with larger holes.
Hammer Drill Chuck and Bits
The most widely used hammer drill chuck is the SDS-Plus. SDS-Plus chucks have shank grooves for security but allow the bit to have independent movement.
SDS-Plus bits don’t require any tools for installation so it’s another plus. For larger hammer drills, you may need SDS-Max.
Other hammer and rotary drills use proprietary designs, so read the product description first.
Hammer Drill Attachments
Even a cheap hammer drill will benefit if the right attachments are used. Among the essentials are:
- Scaling chisel: used for removing weld spatter, concrete and rust
- Bull point chisel: used for creating holes in concrete
- Tile remover: ideal for pulling ceramic tiles up
- Cold chisel: this is often used to break up concrete
- Clay spade: used to break soil
Definitions:
- Hammer drill / rotary hammer: it’s a drill that uses hammering and rotation action to break up materials. These are meant for daily use.
- Combination hammer: a dual mode tool that breaks or drills concrete.
- Demolition hammer: these tools are used to break or chip concrete.
Hammer drills with SDS Plus systems have 3 modes: chiseling, drilling and hammer drilling. Combination hammers have two modes, chiseling and hammer drilling.
Interface
The tool’s interface has the components that keep the bit in position. These also move energy from the gearing mechanism and electric motor in the bit.
Spline, SDS-Plus and spline are the most common systems. Spline is the oldest but it has been supplanted by the SDS Plus.
The ranges for these systems are:
- Spline: 3/8″ – 1-3/8″
- SDS-max: 1/2″ – 1-3/4″
- SDS-plus: 3/16″ – 3/4″
A lot of hammer drills with SDS Plus are capable of drilling bigger holes. If the core bit is carbide, it is good for up to 3 ½, while SDS Max hammers with carbide tips can go through 6” and 3 1/8” thru hole bits.
The thru-hole and size core capabilities will hinge on the size of the hammer.
Other Factors to Consider When buying a Hammer Drill
- What type of concrete will you be working on, and how hard will it be? The hardness of the concrete will determine how powerful the hammer drill needs to be.
- What types of tasks do you do? If you do a lot of chipping and drilling, hammer drill will be a good addition to your toolbox.
- If you will be working with a specific hole ranges, find a tool that is suitable for it.
- If you’re looking to add accessories, make sure they are useful and add value to the tool. The top brands often have accessories to complement their products.
Hammer Drill Maintenance Tips
People often ask what is the best drill brand because naturally, they want one that will last a long time. But even the best brand won’t last long if there is no proper maintenance.
- Don’t press the hammer drill too hard, as only a little pressure is required
- Use only bits that are suitable for the hammer and material you are working on
- Follow all the safety and maintenance guidelines
- Inspect the tool after prolonged use for signs of wear and tear
- Wipe off debris and dirt on the bits
- Clean the tool after each use to prevent jamming
- The bit shank should be greased whenever you replace the bits. This is necessary to prevent wear and tear.
- Use only the grease and cleaning agents the product manual recommends
- Most hammer drills have service lights. Learn what they mean and follow the manual for instructions if there are problems.
- Do not use the tool for tasks it is not assigned for. Doing so may cause permanent damage and void the warranty.
- Use clamps or other means to keep the workpiece secure.
- If the tool suddenly stops working or the on/off button doesn’t work, don’t use it.
- If you’re using a cordless hammer drill, make certain it has the power to complete your task.
- Disconnect the tool before changing accessories
- Turn the tool off after use and store it properly. Doing so prolongs the lifespan and reduces wear.
- Inspect the tool regularly if it’s an old one. Look for signs of loose parts, misaligned components etc.
- Do not attempt to fix a hammer drill unless you know exactly what you’re doing. If it’s no longer under warranty, bring the tool to a certified expert.
- Don’t leave your hammer drill around where kids or pets might find it
Frequently Asked Questions
What is the difference between drill and hammer drill?
A hammer drill can be used for drilling and hammering on hard surfaces like masonry, rocks and concrete. They are more powerful and versatile than regular drills.
What is the difference between a hammer drill and impact drill?
An impact drill is mostly used to drive nails and screws in. A hammer drill is more versatile and can be used on concrete and other hard materials.
What are hammer drills used for?
As the name makes clear, a hammer drill is a tool for hammering and drilling. It is often used by builders and contractors for masonry work and other tasks.
What does the dual-mode in hammer drills mean?
The dual-mode allows hammer drills to work on various materials. By switching modes, you will be able to use the tool on concrete, wood and other surfaces.
Do hammer drills come with bits?
No, not all these tools come with bits. Some do, but you should read the product description to be sure.
How long is the warranty for hammer drills?
Warranty length varies, but most warranties are good for a year at least. Most of these products also have a money back guarantee good for 30 days.
Are attachments for SDS Plus and SDS Max the same?
No, the attachments vary. In fact the attachments for hammer drills depend on the manufacturer.
Can I use SDS bits with SDS Plus hammer drills?
It is possible with some hammer drills, but specs and capabilities vary.
Is there a difference between a rotary hammer and a hammer drill?
There are small differences between the two, but they are now used interchangeably.
Hammer Drills – When and What to use
Final Verdict
There are a lot of factors to consider if you’re interested in buying a hammer drill. If you have never bought one before, all the choices and options may seem confusing.
That is what this guide is for, and hopefully, I was able to help you decide what to buy. Whether you’re looking to buy a hammer drill or just want to learn more about hammer drills.
All manufacturers claim to have the best hammer drill, but that is not true. Now that you’re more informed when it comes to these products, you can be confident about the hammer drill you buy.


 7.8 Amp VSR Hammerdrill")


 The Renogy solar panels consist of monocrystalline solar cells to ensure maximum efficiency in space. Its frame is made of aluminum and is designed expressly for use outdoors.
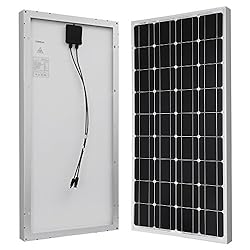 The HQST has been upped to 110 watts for better performance. Tipping the scales at just under 17 lbs, the HQST solar panels come with 72 monocrystalline solar cells for superior performance.
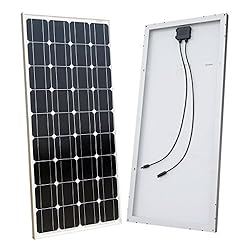 Those who pick Eco-Worthy in the Eco-Worthy vs WindyNation comparison have good reasons to do so. Not that WindyNation isn’t any good, only that Eco-Worthy holds its own very well.