How To Change Drill Bits Black And Decker

It could be quite annoying when your drill bits become dull and become less productive. Of course, you will need to change the bits, but what happens when you have no clue on how to do it?

I made this guide to give you more details on how to change drill bits black and decker.

Changing drill bits could be a hard task that you may want to seek professionals to do it for you or even ask for help from one of your friends.

However, we may not get that help all the time which makes it necessary to master the changing process.

What You Need To Know

Drill bits black and decker is built in two types; the cordless and the corded drill. The cordless black and decker use a keyless chuck while the corded drill uses a key chuck system.

Since chucks come in two different types which are keyless and keyed chuck. It is a fact that the process of changing them is different.

It is important to master the two methods of changing bits if you are going to be using the drill tool often. For this reason, in this guide, I will be talking about both of them.

Changing Bits With Keyed Chuck

Step 1: Stopping the drill

To begin the process you start by releasing the trigger then give some time the drill to completely stop, after which you unplug the drill from the electricity supply.

Step 2: Inserting the chuck key

Keyed chucks normally come with a chuck key which you will be using to loosen the chuck and usually located somewhere in the drill.

Holding the chuck key on one of your hands carefully insert the chuck key into the hole on the chuck making sure that the teeth of the chuck key line up perfectly with the teeth on the chunk.

Step 3:  Opening the chuck

Holding the drill in one hand, slowly turn the chuck key in a clockwise direction using the other hand. The aim is to open the jaws on the chuck, hence keep turning until the chuck opens allowing you enough space to remove the drill bit by sliding.

Step 4: Removing the bit

After loosening the chuck completely, remove the bit by pulling it out with your thumb and index finger. You may also just turn the drill so that it is facing down, dropping the drill but only if you have opened the chuck wide enough.

Step 5: Inserting new bit

After removing the old bit, insert the new bit carefully while keeping the chuck wide open for smooth insertion. Ensure that your bit is inserted with its shank going first and facing the jaws of the chuck.

Step 6: Tightening the chuck

Firmly holding the bit in a stable position with one of your hands, turn the chuck key clockwise using your other hand until the chuck jaws are tightened.

Always make sure that the bit is secured by ensuring that you tighten well to give it a firm grip then start your drill to test if it’s working perfectly.

If you are not comfortable with it, repeat the procedure making adjustments that you feel fit but if your drill has tested to work perfectly, keep the job rolling!

Changing bits on a keyless drill

Step 1: Loosening the chuck

To loosen the chuck you need to grasp the chunk using one of your hands while holding firmly the drill on your other hand. Twist the chuck gently so that it is moving in an anticlockwise direction thereby loosening the grip.

Step 2: Removing the bit

Now that you have loosened the chuck, grip the tip of the bit using your thumb and your index finger so that you are holding it firmly, then pull it out gently.

Step 3: Setting the bit

After removing the old bit definitely, the next step is replacing it with a new one. To do this, hold the new bit firmly using your thumb and the index finger.

Gently insert the new bit into the chuck with its smooth part facing the jaws of the chuck. When you feel that it is in position, pull it back a bit to the length of approximately one centimeter.

Keep holding the bit and the chuck in the position since the bit is not yet gripped and could easily fall out of position.

Step 4: Tightening the bit

While still holding the bit in place carefully and slowly squeeze the trigger to grip the bit in place. Always keep holding the bit while squeezing to ensure that it is perfectly tightened at a straight position.

Now that your bit is changed, start the drill to test it if it is working perfectly. If it is there are mistakes made, repeat the procedure making adjustments keenly but if you are comfortable with it, then your drill is ready for the job.

Final Words

If you are a regular user of drill machine then at one point of time its bit will get dull or might even break and hence replacing it will be of great necessity.

Considering that there are two types of the drill, depending on which type you will be using, you need to know how to fix it if need be and this guide will be quite useful if you are new to changing drill bits.

However, there could be light accidents encountered when changing the drill bits, maybe by just a slip or the drill falling when handling it. You should be careful when undertaking this process and avoid distractions.

From, this simple guide on how to change drill bits black and decker, your bits changing process is made quite simple. The steps are laid down perfectly in a systematic way to ensure that everything falls into position.

How to Clean a Tool Bag – Step by Step Guide

Whether you walk around with hand tools, power tools or garden tools, you need a bag to carry the tools. After using your bag for quite some time, you need to clean it and remove the accumulated dirt.

So, do you know how to clean a tool bag? Would you like a guide on the same so that you can do it perfectly?

The way you clean the tools after use, you should also do the same to your tool bag. Not everyone remembers that tool bags require cleaning. Dusting it doesn’t always save you the trouble of cleaning and you should once in a while clean it in depth.

Here are a few steps that you are to follow when cleaning your tool bag to ensure that you achieve the results that you are looking for.

When you clean your bag, you are sure of using the bag for quite some time before you think of cleaning it once again.

Step 1: Use warm water and soap

Warm water is effective for cleaning because it always removes more dirt and soil. You should learn to use soap when cleaning your tool bag and avoid using detergents and bleach.

Do not wash it straight away. Instead, soak it for some time first. Soaking the bag will thoroughly dampen the different stains hence giving you an easy time when you start washing it.

Always prepare warm soapy water and rinse a couple of times with clear water. If you use soap with cold water, you will not be able to achieve the desired results because not all the dirt will come out and that is why warm water is always advised

Step 2: Non-toxic cleaner

There is an all-purpose simple green cleaner that is designed to clean off the marks that are in your tool bag and if there are stubborn marks then make a dilution of household bleach to help you rid of the marks and leave your tool bag sparkling.

Stick to using the cleaner because it is the only cleaner that is more effective compared to other cleaning agents such as dry cleaning fluids and lacquer solvents.

All they do is attack the surface of the bag. Avoid using harsh detergents on the tool bag because it can end up ruining the bag and you will have to spend some extra money purchasing a new one.

Step 3: Medium bristle scrubbing

The bag needs a little scrubbing in order to loosen the soiling agent from the embossed surfaces. Do not thorough scrub it because you may end up spoiling the bag, the bag only needs medium scrubbing.

You should only use a bristle because it works well on the bag because using other scrubbers like a steel wool will dull the surface of the bag.

Too much scrubbing might contribute to the destruction of the webbing and the threading of the bag.

With the medium scrubbing, you get to enjoy the appearance your tool bag without ruining it whatsoever.

The level of scrubbing is determined by the material of the bag because there are materials that are not supposed to be scrubbed and here are those that also need a thorough scrubbing.

Step 4: Clear rinsing

After cleaning the tool bag using warm soapy water and medium scrubbing it, ensure that you rinse it a couple of times using clear water.

Several clear water rinses ensure that there is no soap on the bag. This should be the final touches of the cleaning as clear water will rinse the tool bag completely in such a way that it will get rid of all the soapy remains and the remains of the cleaner from the scrubbing.

After you have rinsed it in a proper way, you can hang it to dry before you get to use it once again.

Final Verdict

If you know how to clean a tool bag, maintaining it becomes easy. This leads to a long life expectancy and you will be able to use it to for quite a long period of time.

Ensure that you do clean the bag one in a while because regular cleaning might make the bag weak and might destroy the webbing and the threading of the bag.

Make sure that you follow up the above steps and be sure to always carry a tool bag that is clear and in a very good condition. Prolong the use of your tool bag by putting it consideration regular cleaning and maintenance of the bag.

Don’t just dust your tools and forget all about the bag because it is also important that you do clean your tool bag.

How To Polish With Dremel Polishing Kit

Hobbyists, model makers, and many other DIY experts would like to do polishing, cutting, cleaning of parts of work using a rotary tool that comes with convenience.

Thanks to modern Dremel kits, an excellent finish for remarkable results is just a step away for a fervent when doing the polishing.

Are you intending to do polishing of metals, glass, stone, brass, stainless steel, aluminum or any other materials? You will undoubtedly need the right combination of tools for a perfect job.

Additionally, polishing could take different forms and styles depending on what kind of application is at hand.

This is why it is important to ensure you have your rotary tool kit ready to avoid wasting time. This will also enable you have smooth polishing too.

I take you through a quick research on polishing aluminum and glass. You can do polishing on so many other materials as well.

What to consider before polishing with your Dremel kit

Could you be looking forward to removing scratches to your material? Are you doing polishing on an overcast surface? Removing a scratch can be confused with sanding.

There are different kinds of shapes of diverse polishers one can employ to do the polishing. They include;

[su_list icon=”icon: arrow-right” icon_color=”#329d40″]
  • The cylindrical polishers
  • knife edged types
  • Bullet designs and
  • The wheel plus much more.
[/su_list]

You can attach any of these polishers and fit them into their respective mandrels and Dremel tool.

Impressively, these polishers are normally ready to use without any compound. When polishing your glass, ensure your polishing kit is ready. This will save your time and ensure your projects are handled smoothly.

I suggest also you take into account these details for effective polishing using a dremel tool.

[su_list icon=”icon: arrow-right” icon_color=”#329d40″]
  • Consider starting with the point where the appearance should be scratched and left the weakest.
  • If you also come across larger scratches, it is ideal you start with them.
  • Thereafter, you can use fine accessories to create a more impressive appearance on the glass through regular scratching.
[/su_list]

How to polish aluminum with a dremel polishing kit

[su_list icon=”icon: arrow-right” icon_color=”#329d40″]

Do you have an aluminum that is dull? Aluminum once it stays for some period it can lose its reflective finish.

This is because of harsh weather condition effects, maintenance conditions among other aspects.

Whether you have a motorcycle part, bumper or any other aluminum material you can do polishing on your materials for that shiny look.

All you need to do is use your dremel polishing kit with attachments suited for such dull surfaces. Pay attention to the following steps while polishing your aluminum.

  • Use your Dremel to apply an exhaustive and satisfactory sanding process of the aluminum. I suggest you use, at this point, a heavy grit paper.
  • With the help of a smooth grit paper, you can realize fine grits as you do away with pits and the minor scratches during the polishing. This will help you achieve smooth polishing quickly.
[/su_list]

How to use the Dremel to polish glass

Depending on the kind of Dremel you are using, consider unplugging your Dremel from the electrical connection, if your model is cordless. Follow the following steps as you engage your rotary tool.

[su_list icon=”icon: arrow-right” icon_color=”#329d40″]
  • Check out the collet (a round metal nut used to hold the Dremel attachments tool in place) on your Dremel. At its top part, you need to press and hold its shaft lock button.
  • Thereafter, you need to twist the tip of the Dremel clockwise using your hand until it can’t turn further.
  • Position the collet wrench of the Dremel over the collet nut. After that, turn it counterclockwise to let it loose.
  • Slip the 60-grit sanding drum into the Dremel collet and again turn the wrench of the Dremel clockwise. This will ensure the collet wrench is well tightened to the maximum.
  • Resultantly, connect the power supply cable of the Dremel into the wall power supply socket.
  • Keep holding the Dremel using your forefinger or middle finger near the tip of the Dremel shaft. You need to keep adjusting the speed of the dremel from low to high speed variably. At this point, turn the on/off button, on.
  • While running the Dremel over your aluminum material slowly, apply strokes on its surface moving from side to side. This is to ensure there is sanding in all parts of your aluminum material.
  • Once satisfied that the sanding and polishing is sufficient, you can now turn your Dremel off and disconnect the power supply cable from your power supply socket.
  • You can do the sanding through the same way as numerous times as you may wish until your polishing is perfect. You can replace the grit size interchangeably.
  • Consequently, wipe out your aluminum using a dry washcloth to do away with any particles and dust. You can position your polishing wheel tightened and place the Dremel tip in a can of polishing rouge. This is to allow the polishing rouge application on the polishing wheel.
  • In conclusion, remember, the more polishing rouge applied the high-gloss mirror finish you can achieve on your aluminum.
  • Avoid pressing down on the aluminum using the Dremel tip since the rotary tool is meant to operate effectively on its own. This is to avoid chances of bending or breaking the Dremel polishing attachments.
[/su_list]

Other materials used to polish with dremel polishing kit

[su_list icon=”icon: arrow-right” icon_color=”#329d40″]
  • Stones or gemstones
  • Stainless steel among others
[/su_list]

Conclusion

It is imperative to wear appropriate eye protective gear or dust mask to protect yourself. It will be a remarkable idea to wear also a long-sleeved top and apron while doing your polishing.

Additionally, depending on the material you are polishing, ensure you use the appropriate Dremel rotary tool to achieve excellent results.

In addition to that, you can clean up the working surface using a warm soapy solution of water with soft clothing. This will ensure any possible excess polishing composite or dirt is cleaned.

Lastly, it is prudent to dry off the working surface using a soft wool or dry piece of clean soft cloth. Thereafter, store your polishing kit with the Dremel safely for next use.

Your DIY polishing projects should be easy to carry out. Realizing perfect finishes is just the right polishing kit and Dremel away.

How to Drill a Hole in Brick – Step by Step Guide

Have you ever tried making a hole in your brick but failed?

Are you new to drilling and don’t know how to go about it?

If this two big questions best reflect your point of concern then stop worrying. This article is dedicated to helping you out in your drilling job, ensuring that you perform it with great simplicity.

I specially made this article to give you more information on how to drill a hole in the brick. Drilling through bricks is not the simplest job that anyone can just do it. It requires skills and good performing materials. This means that you must be prepared before you start.

I understand that lack of drilling skills could be a headache, especially when you are just by yourself. However, after going through the guide, you will not have trouble drilling holes in bricks.

What You Need

Advance preparation is the key the success of your intended drilling job. There are certainly important tools that you must have to avoid damaging your wall. These tools include:

Drill

Bricks are not the softest materials to just drill through them easily, they are made strong and that’s probably why we use them to build walls. For, this reason you need a strong machine to counter its strength and for this case, a drill machine is a perfect tool to use.

However, having a drill is not enough, you must possess the skills on how to handle it because they could be dangerous if not used carefully.

Masonry Bit

Drill work in hand with a masonry bit. This is among the essential tools that you need to have in place when planning to drill.

However bits come in different sizes, so depending on the workload ahead and the size of the hole you desire, in terms of width and length size, you should choose one that best fits the job.

However, during the drilling process, it is possible to run into difficulties such as the drill bending, turning blunt or even breaking. For this reason, you should always have spares in place to avoid such distractions to completion of your job.

Bucket of cool water

With the application of great force on a hard surface, the drilling bits will encounter friction due to resistance from the brick which produces heat making the bit turn hot.

You, therefore, need a bucket of water on your working site for easy accessibility whenever the need to cool the drill bits arises.

Plumber putty

When done with the drilling process, you will need to seal the hole to avoid substances such as liquid getting into that hole. Hence, you need to have enough putty on the site.

Drilling A Brick Wall Guide

The first thing before you starting drilling is to choose a good location. Always choose a place that is free from any cracks even if they are the smallest since they could lead to wall damage.

Once your location is in place, with your drill in good condition you are fit to get the job done!

Step 1: Plan the hole

Before you begin to drill the hole, it is important that you know the size of the hole that you need to produce. Normally, you use a bolt to hold something in place inside the hole.

For this reason, measure the width and the length of the bolt that you will be using or any other securing device. This measurement will provide you with the size and length of the drill bit that you need to get the job perfectly done.

I recommend that you drill a hole that is a bit larger than the securing object used. If you need a large hole, then start drilling using a smaller bit to make a small pilot hole.

Step 2: Selecting the best drilling bit

Now that you have in mind the size and length of drilling bit needed and ensuring that your drill has large power capacity, insert the bit into your drill.

If your drilling machine does not have enough power to drill through a brick wall then you should consider hiring one.

Step 3: Marking the wall

How else could you know where to drill the hole without marking it? Marking the place to drill ensures maximum precision is attained.

Marking also gives you an opportunity to ensure that the place you intend to drill is free from any electric lines, plumbing or any other structure on your wall that should not be tampered with.

A tip to easy drilling is drilling through the cement mortar unlike drilling directly through the brick since the brick could be more compact and it also prevents the bricks from shattering.

Step 4: Put on safety gear

Before you start drilling, you need to wear the appropriate safety gear and any other safety clothing that is necessary.

This wear includes googles which protect your eyes, gloves to protect your hands and mask to filter the dirty air. You should always ensure your personal safety is not compromised.

You should also ensure that you have read and understood the manufacturer’s instructions on how to use the drilling machine and seek out for clarity where you don’t understand.

Step 5: Drill hole

The process of drilling the hole largely depends on the size of your intended hole.

If you need a large hole, then you will begin to drill with a small drilling bit to get a small pilot hole at the exact place you had marked.

If what you need is a small to medium size hole, then use an appropriate bit size and drill carefully.

Step 6: Cool the bit

Considering the fact that bricks could be very compact, drilling through them is not that easy. With high power drilling capacity against a hard surface, it is impossible to avoid friction.

This friction is responsible for turn the drill bit hot. For this reason, you need to keep a bucket of water near your working place; this enables you to cool the bit from time to time.

When cooling the drill bit, you can either pour water over the bit or alternatively dip them into the water. However, if you choose to dip the bit, then you should do so with utmost care to avoid getting the whole drill wet.

Step 7: Checking the bit

When drilling, ensure that the bit is working properly and portraying no bents or signs of being blunt.

On some occasions, your drill might become stuck in the wall. If this occurs, do not freak out, try to reverse the bit to pull it out carefully and if this is working then you might need to dig through the masonry to retrieve the bit.

However, digging through the masonry is not the best way as it may damage the brick. This is why it is important to keep checking the bit to ensure that is is in good condition to avoid such costly mistakes happening.

Step 8: Seal the hole

Now that you have successfully drilled through the brick, which I hope so, insert the item through the wall and seal the opening with the suitable sealing device.

[su_youtube_advanced url=”https://www.youtube.com/watch?v=JnOak0eT_0k” controls=”no” showinfo=”no” rel=”no” modestbranding=”yes” https=”yes”]

Conclusion

On certain occasions, you may encounter confronting situations that require you to drill through the brick in order to get an object pass through it.

For instance, when setting up certain connections that use a cable or just pipes at times it is impossible to avoid going through the brick and for this reason you are going to need to make a way through the brick.

If you have no clue on how to go about it or what you need to have could be disturbing. However, drilling through a brick could be quite simple if you have the tools necessary plus the skills needed.

This is why this guide on how to drill a hole in brick is so helpful to anyone interested in undertaking such a task. With the well laid down simple to use the guide, you will never go wrong in drilling through bricks.

If it’s your first time drilling through bricks, then you definitely need to go through this guide first to avoid running into mistakes which could prevent you from completing your task or even running into accidents.

Drilling exercise could be dangerous if not done correctly both to your wall and your personal safety when working. Always ensure that you follow the manufacturer’s instructions on using the tools that you will be using.

Whenever you drill a hole into masonry or brick walls, it is important to ensure that you perform the process with care to get it right the first time. If you will be making mistakes, then you may end up with holes that need to be filled in.

Drilling through brick walls could be this simple, with a good work plan and availability of necessary tools, your drilling job is guaranteed success.

How to Sharpen Router Bits – Ultimate Guide

Making a masterpiece out of every work piece that you cut sometimes is as simple as sharpening your router bits, but sharpening router bits is not as easy.

You might think that you are an expert, but wait until you read through this article and find out that there is a lot more that you did not know on how to sharpen router bits.

If you are a Newbie looking for a credible source of knowledge into router bits sharpening, then this piece will help you. Blunt bits will have your work pieces make sad faces at you, pathetic jobs.

A lot of things can all go wrong, due to a dull router bit. These include tear outs, excessive feed pressure, or burning.

The solution to all these mishaps might just be lying in sharpening your router bits. Before you resort to sharpening, you might want to clean up the bit first to clean up crud around the edges.

Sometimes cleaning the bit could solve what you thought was a blunt bit. If it doesn’t, it is still an important part of the process.

You will also learn that several other things relate to sharpening router bits such as router bits maintenance and proper routing practices.

I am making sure to include all of these things so that you will not have to look for that information from some other place.

Signs Of A Blunt Router Bit

To tell for the blunt router bit, run it through your fingernail an if it just slides through without making a shaving, and then your bit is blunt.

But before you come to this there is the common overheating, which only holds true if you didn’t get overheating before. Then there is the blackening of the work pieces, which serve as a clear indicator.

The blackening of the work pieces to the left of this illustration are indicators of a blunt router bit. The fine images on the right shows the results after sharpening the bits.

Avoiding false positives

You could diagnose a router for being blunt while in the real sense it is not. If you have set your router to very high speeds, then it is prone to overheating as a cause of the high speeds.

Also if you are trying to make very deep cuts at once, it is almost inevitable that there will be resulting blackening.

Choice of sharpening tools

Of course, you will need a file. A diamond needle file is the best as it will work for the smallest to largest of the bits.

You will get the best results if you use fine or extra fine abrasives, the grit size for these abrasives are usually 600 and 1200 respectively.

Normally, some people will sharpen their routers while holding them by hand, but often such people end up destroying the bits.

You might want to use a chuck. You can alternatively use the router collet if you have one. The wrong choice of abrasive, which would be the use of coarse abrasives, could fracture the router`s edges.

Tips to doing it right

The most basic of tips is that you will require a good light source. Also, comfort is vital in ensuring for an excellent job.

Your point of interest will be the face of the flute, meaning that you will have to keep off the outside edges. Ensure that as much as possible, you sharpen uniformly.

A non-uniform sharpening will alter the balance of the router, which will translate to the smoothness of the cut.

Uniform sharpening means giving each flute a uniform number of strokes as you rotate through the flutes until you get the sharpness that you require.

Consider using some lubricant for effective sharpening. Lubricating also prevents excessive clogging of your abrasives. You can tell if the router is sharp enough by feeling the edges. It should also show no flecks when you look it under a strong light.

Using file abrasives

Remove pilot bearings if any

For bits that have a pilot bearing, always remove it if it is removable. Mistakenly the pilot bearing at any spot will ruin it, and make the whole router useless.

Cleaning

Remove build up by cleaning the router using a brush. Feel free to use a cleaner that will help you make for the cleanest router. Such a cleaner is the oven cleaner.

Honing

After cleaning it is time to sharpen. When working with abrasives, you can over hone the edges. So, you should keep strokes at a minimum as you alternate the edges. You should start with the fine file and then finish using the extra fine file.

Using a diamond wheel

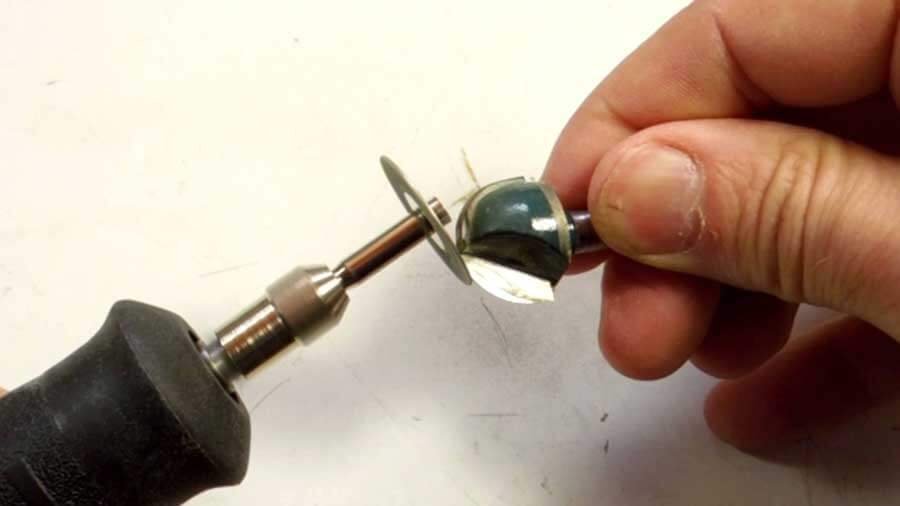
An alternative to sharpening router bits using a file is the use of a diamond wheel. Diamond wheels allow for faster and finer finishing. Once you are equipped with the diamond wheel, you will also need a dermal tool.

The figure illustrates the use of a diamond wheel. You can choose to secure the router bit or to hold it by hand.

Step 1: securing the router bit

Securing the router bit is essential especially for those that don’t have a strong grip. Holding the bit by hand is also tedious so you should consider securing the bit to a workbench. The downside to securing it to a workbench is you will have to repeat the process of securing multiple times you rotate through the flutes.

Step 2: Sharpening

As a rule of thumb, it is recommended that you always start with the flat parts. Then proceed to the edges. I would prefer leaving the edges to professional sharpeners. Ensure to maintain uniform pressure all over the edges to prevent over sharpening some parts.

Note

An important note to make is that there are different types of router bits. As such the important thing to remember is to keep to the flat surfaces of the router bits. Different configurations of the router bit give for different applications. As such let’s get sample types of configurations. You will also learn that the configuration dictates the type of sharpening tool most suitable, either the needle file or the diamond wheel.

Router maintenance tips

After every use of the router always make it a habit to clean the bits by blowing off the dust. Also, use a resin remover to prevent accumulation and subsequent hardening of the resin. It affects the cutting efficiency of the bits. Dirty shanks encourage the development of blurs and rust that inhibit proper tightening of the router bits. Oiling the router bits could result in rust. So, instead wipe them dry and store appropriately.

Always make it a practice to use coolants on the bits while routing. The routing process causes friction and heat buildup that contributes to wear of the router bits. Deteriorating edges indicate that it is time to do a complete makeover by replacing the bits.

Making clean cuts with routers

The first step into making clean cuts with routers is by ensuring for clean and sharp router bits. ½” bits usually result in much fewer vibrations hence giving for finer cuts. Before you start routing, you should always ensure that the bit is properly installed to ensure it doesn’t come loose during operation.

While working with different types of woods ensure to match the speed with the wood type. Slower speed and a high feed work best for some wood while others will finish just fine with high speeds. You should also ensure that you clear off the chips between the work pieces and the router bits as they hinder proper machining.

It is always recommended to make many light cuts rather than one heavy cut that will most definitely result in blackening, and inevitably heat buildup. Making heavy cuts also impacts a heavy load on the bits that results in bits getting dull and wear fast. You should also secure the work pieces tightly to ensure that they do not move to ensure for consistent feeding.

It is also important to route in the right direction to ensure proper contact of the bit with the stock. While working on outside edges you should rotate the bit in the anti-clockwise direction, and in the clockwise direction for inside edges.

[su_youtube_advanced url=”https://www.youtube.com/watch?v=HqS5KAaltCg” controls=”no” showinfo=”no” rel=”no” modestbranding=”yes” https=”yes”]

Final Verdict

Now you know how to sharpen router bits. Every expert will tell you that you need a professional to do the real sharpening. This guide equips you with the knowledge to retouch your bits in between visits to the professional sharpeners. Learning to sharpen you router reduces the trips that you will have to make to professional sharpeners.

You do not have to always run to them when the bit gets slightly blunt. You as well have got information on how to correctly diagnose for blunt router bits.

Remember proper use and maintenance also plays a great role. The right practices will see for sustained sharpness, so you do not have to sharpen the bits a dozen times. Remember every sharpening exercise comes with wear and tear.