The best demolition hammer is not the most expensive or feature-packed. Rather it depends on what material you’re working on and how you intend to use it.

Are you a tradesman, a DIYer or just need to use the demolition hammer occasionally? Do you break up chunks of slabs or just take out ceramic tiles?

Whatever your needs are there’s a demolition hammer that can do it for you. If you don’t have a lot of time, just go over the reviews and table below.

If you want to learn more about demolition hammers you may read the rest of this guide.

Top 5 Demolition Hammer: Comparison

 Product BPM (blows per minute) Motor Power Accessories Chisels Included Weight Dimensions
XtremepowerUS 2200Watt 1900 2200 watts Safety mask, goggles, gloves, bar wrench, oil feeder, carry case 1-1/8″ Bull Point Chisel, 1-1/8″ Flat Chisel 33 pounds 13.8 x 31.1 x 8.3 inches Check Price
TR Industrial TR89100 1800 11 amps Safety mask, goggles, gloves hex/flat/spade chisels 32 lbs 30 x 14 x 7.5 inches Check Price
Bosch 11321EVS 2900 13 amps Carry case Bull and chisel bits 13.6 pounds 20.5 x 16 x 6.2 inches Check Price
Neiko 02845A 1800 11.3 amps 4 carbon brushes, safety kit 1-1/4” x 16” flat chisel, -1 16” point chisel 40 pounds 6.5 x 27.9 x 11.8 inches Check Price
TR Industrial TR89105 1800 11 amps Safety kit 1 flat and 1 pointed chisel 45 pounds 30 x 14 x 7 inches Check Price

Best Picks of Demolition Hammer

Demolition hammers come in all shapes and sizes, but I chose these five for their outstanding features and capabilities.

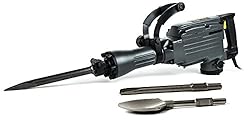
#1: XtremepowerUS 2200Watt Heavy Duty Electric Demolition Jack hammer Concrete Breaker W/Case

XtremepowerUS 2200 Watt Heavy Duty Electric Demolition Jack hammer Concrete Breaker W/Case, Gloves
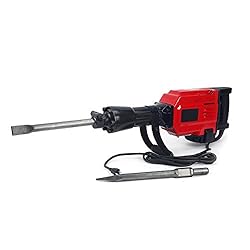
The XtremepowerUS is one of the best demolition hammer for digging concrete and other materials. Apart from demolition, the XtremepowerUS is also suitable for chipping and trenching.

Its 2200 watt output motor allows you to break holes in bricks and concrete blocks as well as slabs. Its BPM is 1900 so you’ll get more work done in less time.

Accessories include a safety mask, safety goggles, gloves, a 1 1/8” flat chisel, a hexagon bar wrench, an oil feeder, and a 1 1/8” bull point chisel. You can put these in the provided blow mold case.

Performance-wise the XtremepowerUS is comparable to more expensive models. It can break an 8 x 100 ft (W x D) surface in a couple of days without needing a lot of effort.

The XtremepowerUS comes with test oil only so make sure to apply fresh oil. It’s easy enough to do and the instruction manual is easy to follow.

The two bits included are of high quality and can handle a lot of materials. Without the cord, the XtremepowerUS weighs just 35 lbs so it’s not a burden to carry.

The XtremepowerUS has become the popular choice if you’re looking for an alternative choice to the more expensive brands. It’s not the most powerful demo hammer, but for projects that require just a few hundred feet of breaking, this will do.

The XtremepowerUS demo hammer works very well thanks to its bits and oil. This tool has very little vibration so it won’t tire you out.

If you’re in the market for a good demo hammer that won’t break your budget, this is one power tool to consider.

What I Like

  • Comes with gloves and carry case
  • Breaks up various materials
  • Powerful motor
  • Lightweight
  • Easy to use
  • Ergonomic design

What I Didn’t Like

  • Can only use proprietary bits
  • Case is made of plastic

Click Here To Find The Best Price Today

#2: TR Industrial TR89100 Electric Demolition Jackhammer with Point

TR Industrial TR89100 Electric Demolition Jackhammer with Point, Flat and Spade Scoop Shovel Chisels Bits, 4-Piece Set

The TR89100 is a versatile demo hammer you can use to break concrete and other surfaces. Certified safe, this tool goes up to 1800 blows per minute for efficient material breaking.

Its swivel auxiliary 360-degree handle provides greater maneuverability, and the 6.5-foot cord gives you greater freedom of movement.

The TR89100 accessories include a pair of work gloves, safety goggles, and spade/flat/hex chisels. Its dual ball bearing armature and CNC machined design adds to the durability.

The 11 amp motor provides extra power and its carbon brushes extend its life. As far as performance goes, the TR89100 breaks up concrete, pavement, rock and more.

The TR89100 underwent the TUV 176 hour endurance test and can take a lot of punishment. At just 32 lbs the TR89100 is lighter than others so it’s more convenient to use for long stretches.

The TR89100 performs better than the average demo hammer because of its motor and high BPM. It also comes with 3 chisels (scoop shovel, flat and point) so you can use it on different materials.

Its 55 HRC hardness rating and durable gears result in superior performance. The OSHA approved ETL listing tells you how effective it is.

With its pointed chisel, you’ll be able to use it for drilling, while the flat chisel is used for breaking up chunks. If you want optimum performance make sure to use the proper oil.

The TR89100 runs smoothly and consistently. Both bits are easy to set up and compared to other demo hammers you’ll get more things done.

No matter what tip you’re using, the 360-degree swivel auxiliary handle makes adjustments easy. Overall, the performance is consistent and impressive.

What I Like

  • Breaks clay, bricks, concrete and other materials
  • Has UL listed cable
  • Plug is double insulated
  • 1800 BPM
  • Safety goggles included
  • 360 degree handle

What I Didn’t Like

  • Heats up a bit when used for long periods
  • Carry case is plastic

Click Here To Find The Best Price Today

#3: Bosch 11321EVS SDS-Max Demolition Hammer

Bosch 11321EVS SDS-Max Demolition Hammer

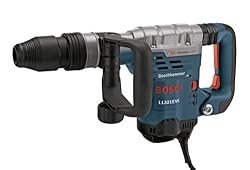
The Bosch SDS Max has a BPM 2900 rate so you can break up concrete and other materials. It also has a combination dual selector and vibration control that cuts down vibration significantly.

The Bosch has a 13 amp motor with a 9.6 foot pound impact force, giving it extra power. This demo hammer also has a service minder light so you’ll know right away if maintenance is needed.

Its auto max speed dial is another useful feature as it makes certain you’re at maximum speed whenever the Bosch is activated.

Its Vario-Lock positioning enables you to use the best possible angle for chiseling. This feature is complemented by its constant response circuitry so speed remains constant under load.

The Bosch has excellent safety features including overload protection. The rear handle padded runs well with the rotating auxiliary handle so you’re comfortable with it.

This Bosch demo hammer has anti-vibration built in the system so it works smoothly. Combine this with the comfortable grip allows you to work stress free.

When comes to performance the Bosch compares well to more expensive models. It’s not just for breaking concrete but also breaking tiles, wood and others.

The Bosch packs enough power to go through thick slabs and is an ideal tool for renovation work. It is a powerful as bigger models but weighs less.

The Bosch is durable, built to last and provides a good amount of precision. It combines accuracy with power so it works well for a lot of material breaking up.

If the typical demo hammer doesn’t provide the power you need, the Bosch is one that will work.

What I Like

  • Excellent power to weight ratio
  • Convenient speed dial
  • Maintenance light indicator included
  • Has overload protection
  • Made from heavy duty materials
  • 1900 BPM

What I Didn’t Like

  • Switch setup could be better
  • Instruction guide needs improvement

Click Here To Find The Best Price Today

#4: Neiko 02845A Electric Demolition Jack Hammer with Point and Flat Chisel Bits

Neiko 02845A Electric Demolition Jack Hammer with Point and Flat Chisel Bits | Includes 4 Extra Carbon Brushes and Safety Protection Kit
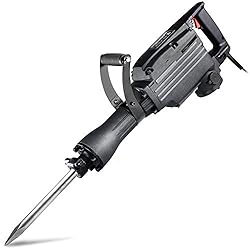
This demolition hammer review can say the 02845A is a versatile tool. With 1,800 impact blows a minute and an 11.3 amp motor, it’s capable of breaking up earth, ground, brick, and concrete.

The 45 joules give the 02845A the force required to break up rough surfaces. For home improvement and renovation, this tool delivers.

Apart from the 02845A you also get work gloves, safety goggles, 3 wrenches, an oil container, and 4 carbon brushes.

A pair of chisels are also included: a 1-1/4” x 16” flat and a 16” point. Both are alloy steel, heat-treated and drop forged.

A blow-molded case is included for your convenience. The case has wheels so you’ll be taking this with you.

A good demolition hammer has well made auxiliary handles and the Bosch is a good example of that. Its 360-degree swivel design means you get an optimum grip, support and it’s non-slip as well.

The 02845A comes with a helical gear mechanism that runs quietly and smoothly compared to a traditional spur gear. This also minimizes wear and tear so it lasts longer.

The 02845A is made from solid metal, and its powder coating makes it resistant to corrosion. Even when you break heavy materials, the 02845A holds up.

This demo hammer produces better results than lower quality products owing to its design, and it lasts longer too.

The bottom line is this demo hammer can handle heavy materials as it runs better. Going back to the handle, it’s detachable so you can customize its use the way you want to. With these features, you can start breaking concrete right away.

What I Like

  • Good safety features
  • Extra carbon brushes
  • Well made chisel bits
  • Powerful motor
  • Durable construction
  • 360 degree swivel handle

What I Didn’t Like

  • Packaging needs improving
  • Lube applied on the Neiko when shipped takes time to remove

Click Here To Find The Best Price Today

#5: TR Industrial TR89105 Original Demolition Jack Hammer with Point and Flat Chisel Bit

TR Industrial TR89105 Original Demolition Jack Hammer with Point and Flat Chisel Bit, Silver

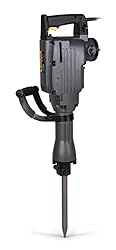
The TR89105 runs on an 11 amp motor and is good enough to break basement floors, clay, concrete and other rough surfaces. Its impact is 1800/min at full load so it’s got the power to do a lot of work.

The TR89105 is ETL listed so that should give you peace of mind. The accessories include suede working gloves, safety goggles, an oil container and a couple of wrenches.

You also get a flat chisel and a hex pointed chisel for working on different materials. The flat chisel does a good job of smashing chunks of concrete, while the pointed chisel is what you’ll use to drill.

This means the two often work together: you start with the pointed chisel and move on to the flat one for the breaking. As you work the auxiliary handle it allows you to adjust and hammer in comfort.

The TR89105 also has a dual bearing armature provides more power and greater energy efficiency. The presence of copper commutator bars add greater flexibility.

The TR89105 weighs only 35 pounds so it’s easy to carry around. For home improvement and DIY projects, this tool gets it done.

This demo hammer can take out a 16’ x 2’ brick & mortar structure in half an hour or so. If you used a regular hammer tool that would take a long time.

The TR89105 is also effective for cleaning up concrete, stones, rocks and so on. It’s easy to use and the additional brushes is a nice bonus. What it comes down to is this demo hammer does what it says.

What I Like

  • 11 amp motor
  • Great for drilling and breaking surfaces
  • Consistent performance
  • Comfortable handle
  • High performance bits
  • UL/CSA compliant

What I Didn’t Like

  • Case is made of plastic
  • Better suited for concrete than wood

Click Here To Find The Best Price Today

What is a Demolition Hammer?

A demolition hammer is used for breaking and demolishing materials similar to a jackhammer. Whereas heavy jackhammers are vertically held, demo hammers are operated horizontally.

There are other names for a demolition hammer, so don’t get confused when shopping:

  • Pneumatic Drill
  • Hammer Breaker
  • Demolition Breaker
  • Demo Hammer
  • Concrete Breaker
  • Demolition Hammer Drill

Hammer tools and demolition hammers are not the same thing. A hammer tool is for drilling holes and fastening screws, i.e. building stuff. A demolition hammer as I explained, does the opposite and is used for breaking materials.

What is a Demolition Hammer Used For, and What Does It Do?

You use a demolition hammer to break bricks, rocks, concrete and other materials. This is the tool to use if manual tools don’t have the power to break the materials.

Demolition hammers have a bit on the end, and this is what gives the tool the force necessary to break hard objects.

These tools work in different ways but they have the same purpose: breaking. You’re probably familiar with its use on concrete, but you can use a demo hammer in other ways.

Types of Demolition Hammers

  • Pneumatic Demolition Hammer: pneumatic demolition hammers are often used for tunneling, quarrying and mining. It’s also used to break concrete, asphalt and road work.
  • Electric Demolition Hammer: electric demolition hammers are more suitable for home use like home improvement and remodeling.

Demolition Hammer Bits & Chisels

You can change the chisels and bits to generate different results.

  • Bushing Tool: its numerous carbide points are suited for taking down rough concrete spots and assorted cleanup jobs
  • Lifter / Flex Chisel: you use this tool for scraping and removal. Its metal blade is durable yet flexible
  • Scabbler: used to clean surfaces before bonding and also to smooth surfaces
  • Stake Driver: this bit is used to push concrete in stakes
  • Bull Point Bit: this is an all purpose tool for breaking
  • Flat Up Chisel: you use this to give edges a fine finish and for better directional control
  • Spade: used for edging dirt and asphalt and providing a flat finish
  • Pointed Bits: its pointy tip is used to break cracks in concrete, rocks, stones and take out mortar in bricks
  • Asphalt Bit: for asphalt cutting

What Size Demolition Hammer Do I Need?

A small demo hammer is fine if you just do small tasks and prefer to work with a light tool.

A bigger demolition hammer is preferable if you work on large surface areas or if you break up rough materials.

How to Choose a Demolition Hammer

Demo hammers are versatile, but you’ll get optimum results if you use the right tools.

Choose the Right Bit

Your demo hammer is only as good as the bits you use. Make sure the hammer tip is the right one or replace it if necessary.

This is one reason why a lot off DIYers buy several bits and chisels. In case you need something else, just exchange the tip.

The Right Tool for the Job

The rule of thumb is the larger the area you’ll work on, the more powerful the demo hammer needs to be.

A demo hammer equipped with a large bit does a better job of piercing and removing chunks without crumbling the structure.

What Materials Will You Work On?

The material’s strength determines what type of demo hammer you’ll need to use. Large, blunt bits are ideal for crumbly materials.

Strong materials will benefit from a sharp demolition hammer. Smaller points apply more pressure in limited space for more effective piercing.

Breaking Walls and Floors

Almost any type of demolition hammer will do for open walls or an unobstructed floor.

Walls in tight areas need more specialized bits like tubes and spades. Demolition hammers with pencil-like bits are ideal.

The narrower the demo hammer bit the farther and more efficient the breaking.

You also have to consider the type of work you’ll do for the long term. Get a more versatile demolition hammer if you’ll do more heavy duty work in the future.

Features to Look for in a Demolition Hammer

  • Bits Compatibility: what types of bits come with the hammer? Is it compatible with the tool you need? The greater the compatibility the more you can do.
  • Weight: this becomes an issue if you’ll be hammering heavy materials.
  • Physical Dimensions: the same thing as the weight: it’s going to be important if you’ll use it extensively.
  • Vibration Control: look for a demo hammer with a high vibration control for more consistent results.
  • Power: demolition hammer power is measured in watts, BPMs, amps and impact force. Check the product specs to know how it works.
  • Housing: demolition hammers are housed in plastic, metal or composite materials, and this will do for home based tasks. Metal tubing is the better choice for professional and onsite work.
  • Handling: look for a demo hammer with rubber handles or any other comfortable material.
  • Oil level indicator: this applies if the demo hammer is oil powered.
  • Durability: the product specs will tell you if it’s for light or heavy duty work. That also gives you an idea of how durable it is.
  • Carry Case: essential for transport.

Safety Tips For Using a Demolition Hammer

Whether you’re new to demo hammers or been using it for a while, safety practices are necessary.

  • Wear ear plugs or earmuffs if you’re going to use the demolition hammer at the upper decibels.
  • Do not break materials that are above you as the structure might collapse.
  • If the demo hammer is corded, make sure the cord is kept away from hazards.
  • Do not stretch the cord too much as it could get pulled off the socket.
  • Put on steel capped boots to protect your feet
  • Put on gloves to protect your hands from injury
  • Wear safety goggles to shield your eyes from debris
  • Use the demolition hammer only for its intended applications
  • Move heavy demolition hammers with your legs to avoid strain
  • Learn how the safety mechanism of the tool works
  • Use the appropriate chisel/bit for the demolition hammer
  • Never use damaged bits
  • Inspect the demolition hammer on a regular basis
  • Do not use the demolition hammer beyond the cutting bit depth
  • Have a water spray close by to reduce dust
  • Never use a demolition hammer – or any power tool – if you’re tired
  • Make sure you grab the main handle and side grip firmly
  • Adjust the speed if necessary
  • Sometimes you’ll be more comfortable by changing angles
  • Read the operating manual before using the tool
  • Break small chunks at a time

How to Use a Demolition Hammer

The first step is to follow the safety precautions as described above.

  • Wear gloves to aid with the grip. Put on a hard hat if you’re going to demolish walls.
  • Put the right bit on the demo hammer. The SDS shank is the most commonly used as you can slip it on without fastening the chuck.
  • If an SDS shank isn’t possible, a hex shank should work fine.
  • Use a small bit to chip small areas. For large areas, broad pointed pits are preferable.
  • If you’re an electrician you’ll want to use chisel bits as they’re ideal for making conduit runs.
  • If you’re going to split rocks, use pointed bits.
  • Evaluate the work area before starting so you’ll know what bit to use.
  • Turn the demo hammer on.
  • Use the tool at a 90 degree angle. Angling to the right also reduces the chance of the hammer slipping.
  • Angle the demo hammer a bit away from you. This gives you better control of the hammer even as you pound away.
  • Begin from the edge if breaking floors. If breaking walls, start from the middle so the structure goes down safely.
  • Put pressure on the demo hammer for better results.
  • Short strokes – 10 to 20 seconds – is ideal for most occasions.
  • Change angles every now and then when breaking walls and floors.
  • Let the demo hammer tip cool.

Top Demolition Hammer Brands

No demolition hammer buying guide will be complete without mentioning the top brands.  Here are my picks for the companies that you can trust.

  • XtremepowerUS: the company is widely recognized for its powerful demolition hammers. Since the brand was established it’s become the preferred choice of many.
  • TR Industrial: TR Industrial makes some of the best demolition hammer tools in the market. They’re also recognized for their other quality power tools and accessories.
  • Bosch: anyone who has had experience with power tools know the Bosch name.  From rotary tools, demolition hammers to power tools, it’s the name most DIYers depend on.
  • Neiko: Neiko has gotten a lot of positive feedback for their high quality demo hammers. Their demo hammer series is known for being heavy and designed with precision engineering.
  • Makita: Makita was founded in 1915 in Japan, and since then has been regarded as one of the best in the power tools market. Aside from demo hammers, Makita also manufactures other power tools.
  • Dewalt: Dewalt is a US company that manufactures hand tools and power tools. The company was founded in 1923 and is one of the work’s leading tool companies.

Final Verdict

Demolition hammers used to be for professionals only, but they’ve become prevalent and now available for DIYers, homeowners and anyone who needs a power tool to break up slabs, stones and other materials.

The five products I’ve reviewed here are versatile, but the Bosch SDS Max takes the top spot. It’s got more power than the average demo hammer and limited vibration for better performance.

Bosch is known for making great products and the SDS Max is a great example of this.  With overload protection and consistent results, there is every reason to call the Bosch the best demolition hammer.

Click Here To Find The Best Price Today

Featured Image by Mark Hunter/ CC BY

Windynation vs Renogy: 100 Watt Panel Comparison & Reviews

100W Solar Panel

Solar energy is now preferred by a good number of people due to its sustainable qualities. It is a source of energy that is clean and friendly to the environment as well. In case you are interested in this source, you will easily discover that there are companies who are now offering lines of solar panels.

If you want to use solar energy for off-grid purposes though, you can make do with smaller, 100-watt products. In this comparison and review article, I will discuss Windynation vs Renogy.

The brands provide individual 100-watt solar panels plus a starter kit version too. These brands are known in the solar energy industry and I aim to give you a rundown on products coming from those companies.

I also wish to make decision-making easier for you by providing needed information about the two.

Renogy and Windynation 100-Watt Panel Feature Comparisons

 To begin, I will show you what makes up a panel from each brand.

Feature Windynation Renogy
Dimensions 40 x 1.4 x 26.4 inches 47 x 1.5 x 20.9 inches
Weight 25.12 lbs. 19.84 lbs.
Wattage 100 watts 100 watts
Type of panel Polycrystalline Monocrystalline
Price Check Price on Amazon Check Price on Amazon

Renogy and Windynation Panel and Kit Option Reviews

In this part of this article, I am going to talk about various models from both brands. These are short reviews which will provide the essentials of every product.

[p_box] [p_title]#1: Renogy 100 Watts 12 Volts Monocrystalline Solar Panel [/p_title] [p_content] [image_align align=”left”]Renogy 100 Watts 12 Volts Monocrystalline Solar Panel[/image_align] Renogy is one of the industry’s most recognized solar energy product brands and the company often churns out formidable, weather-resistant panels. These panels can either be grouped as a series or matched with expansion kits from the brand.

The panels have a general weight of 17 lbs. and it can give off 100 watts max output. Each panel produces a maximum output of 5.29 A so this means users will be provided with good energy source even on overcast days.

The product also comes with anti-reflective properties and the panels are composed of monocrystalline cells that have a compacted design, making it lots more energy-efficient compared to similar models. The panels are also pretty compact and portable, weighing less than 17 lbs. so users can easily use them on their vehicles.

Apart from being lightweight, the product is also a breeze to install. The panels were built perfectly and it is made of a sturdy design and durable materials which will help them last longer.

It comes with enough company support and backed by a great warranty too. A lot of nice things have been said about this product and I couldn’t agree more.

[su_box title=”Special Features” radius=”0″ class=”pros hf”][su_list icon=”icon: arrow-right” icon_color=”#329d40″]
  • Ideal for multiple panels or 12-volt battery charging
  • Has preinstalled diodes
  • Has 31-inch cables with MC4 connectors
  • Has strong aluminum frame
  • Can endure snow and high wind
  • Ideal output of 500WH each day
  • Backed by 5-year material and craftsmanship warranty and 25-year transferable power output warranty
[/su_list][/su_box] [su_youtube_advanced url=”https://www.youtube.com/embed/fNvnOyn4jQw” controls=”no” rel=”no” modestbranding=”yes” https=”yes”] [p_btn url=”http://www.amazon.com/dp/B009Z6CW7O”] [/p_content] [/p_box] [p_box] [p_title] #2: Renogy 100 Watts 12 Volts Monocrystalline Solar Starter Kit[/p_title] [p_content] [image_align align=”right”]Renogy 100 Watts 12 Volts Monocrystalline Solar Starter Kit w/ 100W Solar Panel + 30A PWM Negative ground Charge Controller + MC4 Connectors +Tray Cable+ Mounting Z Brackets for RV, Boat[/image_align] This model from Renogy is ideal for a good majority of off-grid applications. In case you want energy source for your boat, shed, cabin, trailer or RV then this is a nice option. It brings users power production without the noise and is a beginner-friendly product to boot.

The kit comes with an 8 ft. 10AWG tray cable which links the battery and the charge controller. In addition, the latter has been moved up to the brand’s new negative ground 30A PWM controller called the Wanderer.

It has an ideal output of 500WH and it can charge a 50Ah battery completely from 50 percent within 3 hours based on the sunlight resource. The panels are well-built and dependable pretty much like its tilt mounts. It is a nice partner for your cabin, trailer or RV.

As mentioned earlier, this is a beginner-friendly kit and it is pretty simple to mount due to the helpful instructions and videos the brand has made available for users. If you want direct replies, you can also ask questions through the company’s customer representatives who all provide excellent service and assistance.

Users can expand the setup up to 400W plus it has a great deal of module conversion effectivity, too. So if you are new to solar panels, you might be interested in this one.

[su_box title=”Special Features” radius=”0″ class=”pros hf”][su_list icon=”icon: arrow-right” icon_color=”#329d40″]
  • Includes LED indicators
  • Has negative ground controller
  • Matches gel, flooded and sealed batteries effectively
  • Can be expanded up to 400W
  • Has pulse-width modulation advancement
  • Comes with monocrystalline solar cells
  • Kit does not come with battery
[/su_list][/su_box] [su_youtube_advanced url=”https://www.youtube.com/embed/f36kxSRK0Ik” controls=”no” rel=”no” modestbranding=”yes” https=”yes”] [p_btn url=”http://www.amazon.com/dp/B00BFCNFRM”] [/p_content] [/p_box] [p_box] [p_title]#3: WindyNation 100 Watt 100W Solar Panel  [/p_title] [p_content] [image_align align=”left”]WindyNation 100 Watt 100W Solar Panel for 12 Volt Battery Charging RV, Boat, Off Grid[/image_align]

Windynation is a company based in Southern California in the US which specializes in the manufacturing and wholesale of alternative energy products. This product in particular is pretty lightweight, with the panels only weighing around 18 lbs. so users can easily carry them around with minimal effort.

The panels have a sleek look to them and its high-efficiency solar cells are complemented by busbars. The frame meanwhile is composed of a sturdy yet lightweight, anodized aluminum. There are diodes located under the panel which also come preinstalled by way of the junction box. The connectors for this unit are all MC4 and it also includes two 35-inch cords.

The product has a 5-year labor and parts warranty plus a 25-year warranty on power for the panels too. The panels are built solidly and are ideal for home power backups and for 12-volt battery charging procedures. Because of their portability, users can easily stow them on their RVs, trailers or position them on their off-grid residences.

Another advantage of this model is the fact that the panels are primed for use outside the package and this makes all the process of mounting and connecting it easier for users.

[su_box title=”Special Features” radius=”0″ class=”pros hf”][su_list icon=”icon: arrow-right” icon_color=”#329d40″]
  • Gives 100 watts sustainable, clean power output
  • Ideal for homes, cabins, RVs, trailers and power backups
  • Great for 12-volt battery charging
  • Provides 300-600WH each day based on sunlight source
  • Has strong, reliable aluminum frame
  • Backed by 5-year warranty on labor and parts and 25-year power warranty
[/su_list][/su_box] [su_youtube_advanced url=”https://www.youtube.com/embed/u2N2Jji4vIs” controls=”no” rel=”no” modestbranding=”yes” https=”yes”] [p_btn url=”http://www.amazon.com/dp/B00FE45FD4″] [/p_content] [/p_box] [p_box] [p_title] #4: WindyNation 100 Watt Solar Panel Off-Grid RV Boat Kit[/p_title] [p_content] [image_align align=”right”]WindyNation 100 Watt Solar Panel Off-Grid RV Boat Kit with LCD PWM Charge Controller + Solar Cable + MC4 Connectors + Mounting Brackets[/image_align] This product is something that can be described as a whole off-grid solar setup. One advantage of having this one around is that users won’t feel the need to deal with electrical services in their area and they can be completely independent in terms of power sources.

However, you do have to spend more on batteries and other items for storing energy. It gives excellent performance and the power it releases and provides users is pretty remarkable.

Another great selling point is that this product is ideal for trailers, RVs, backup power for homes and boating trips.

When it comes to assembling and installing the kit, the steps needed for this product is simple and straightforward compared to similar models being sold right now. The parts that make up the system are fuss-free and they fit well jointly. The parts are also composed of strong, dependable materials.

It has an affordable price as well which makes this an attractive system for beginners and budget-conscious folks. The kit comes with simple instructions too which are a snap to follow, even by new users.

Furthermore, the product operates excellently even during overcast days. Lastly, it is backed by a 5-year warranty which is another plus.

So if you are on the lookout for a solar panel kit to cut back on those utility bills or you want sustainable energy around for eco-conscious reasons, this is something you might be interested to try out.

[su_box title=”Special Features” radius=”0″ class=”pros hf”][su_list icon=”icon: arrow-right” icon_color=”#329d40″]
  • Has 30-amp, adjustable P30L LCD display solar charge controller plus battery temperature sensor
  • Includes all required tools for complete system
  • Gives off standard 350WH or 33 amp hours based on sunlight resource
  • Gives off up to 100W of free, wholesome and renewable power source
  • LCD display shows voltage, amp hours, system amperage, DC load draw and temperature
[/su_list][/su_box] [p_btn url=”http://www.amazon.com/dp/B00JML23X0″] [/p_content] [/p_box]


Renogy and Windynation Feature Comparisons

To continue our talk about Renogy vs Windynation, we will now proceed to a comparison of both products. We will discuss the differences and the resemblances of the products from both brands.

Resemblances

[su_list icon=”icon: arrow-right” icon_color=”#329d40″]
  • Both products give off 100 watts
  • Both are great for 12-volt DC battery charging
  • Both have nearly identical maximum operating currents
  • Both items are lightweight
  • Both come with excellent warranties
  • Both are ideal for trailers, RV’s, cabins, short boat trips, vans or for home power backups
  • Both come with parts needed for installing the setup
[/su_list]

Differences

[su_list icon=”icon: arrow-right” icon_color=”#329d40″]
  • Renogy has a monocrystalline panel while Windynation comes with a polycrystalline one
  • Windynation’s panels are bigger in terms of dimensions compared to the Renogy model
  • Windynation is more affordable compared to Renogy
[/su_list]

Which is Better for Users; Renogy or Windynation?

Between the two, which do you think will benefit you more?

Both panels from those brands pretty much give off the same value all in all regardless whether you purchased them as individual panels or you invested in the starter kit version. Both items are made from prime materials and given durable construction hence it can tolerate even weather extremes.

In terms of performance though, this aspect will be individual due to the presence of certain factors which can lay down the amount of amps users acquire by means of the product.

You have to consider the kind of panels too, its size and its effectivity when it comes to output. The Windynation model is of the polycrystalline kind and has a surface area of 1056 sq. inches, which is bigger compared to the monocrystalline panel of the Renogy brand at 1001 sq. inches. Working under load though, the Renogy performed better compared to the Windynation model.

In addition, you have to check the weather and availability of sunlight in your area. Considering a unit’s system and its accompanying charge controller is something you need not forget to examine as well.

When it comes to starter kits, the one from Windynation includes a 30 amp, adjustable P30L LCD solar charge controller plus a battery temperature sensor. The kit from Renogy includes the brand’s Wanderer charge controller.

On the whole, both panels did perform well since both are largely similar and do not really come with serious downsides which can hamper regular energy production. Both panels from the brands are great investments and if you want more bang for your buck, you can always invest in either starter kit from your chosen brand.

In case you want something that is smaller for your vehicle, you can look for products from Renogy. The panels, as mentioned earlier, are more compact and smaller compared to the ones from Windynation.

If you want something more affordable though, you can rely on Windynation products. However if you are after solar power accessories that are compatible and easily accessible, you must consider Renogy since this is the bigger, more well-known brand. You will have better chances finding items that will best fit the Renogy system.

[su_youtube_advanced url=”https://www.youtube.com/embed/Rf4_UKy1lNQ” controls=”no” rel=”no” modestbranding=”yes” https=”yes”]

Final Verdict

To close our Windynation vs Renogy product review and comparison, we still think that what you need best is the product that will match and correspond to your needs very well. We have tallied all of the essentials you need to consider the products from both brands so now you might have a better idea of what product to choose.

It is also important to tackle whether you need individual panels or a complete starter kit. As discussed previously, both brands fared well in terms of performance. However, if price is of utmost concern, you can opt for products from Windynation.

The cost of a product is a critical factor for a lot of consumers. If you are a beginner in the solar power field, an affordable option in the beginning is a good idea. You can learn the ropes of solar power maintenance and production by means of dependable Windynation panels.

However, if money is no object and you want something accessible and reliable for travel or home use, you can opt for Renogy. Then again, what you choose between the two brands will be up to you.

20 Tips to Consider When Deciding Which Dremel to Buy

It's a Dremel 300 Variable Speed Rotary Tool

Photo by Dremel.com

Which Dremel to buy? That is the question every DIY enthusiast asks. Dremel tools are widely used by hobbyists and professionals alike owing to their versatility.

But how do you decide which of these Dremel tools is the best? No worries as we have rounded up the top 20 tips so you’ll get your money’s worth.


#1: Do You Need a Rotary Tool or Die Grinder?

Dremel tools are for home-based projects, DIY and home improvement. The most powerful Dremel tools have a 1.8 amp motor.

A die grinder is a more powerful rotary tool with 6 to 11 amp motors. This allows die grinders to cut thicker materials, so decide if this is the power you need or if it’s too much.

If you’re only going to use your Dremel for light work, there’s no need to buy one of their higher end products.

But if you see yourself doing larger, more complex DIY work, it’s best to purchase one of their more powerful tools or a die grinder.

You can also both: buy a die grinder and use that for heavy work and a Dremel for the typical DIY project.

#2: Dremel is Not the Only Option

Dremel is synonymous with rotary tools, but it’s not the only available brand. Wen, Proxxon, and Dewalt are some of the other companies that manufacture rotary tools.

These other rotary tools are usually compatible with Dremel bits, attachments and accessories.

Even if you limit your options to just Dremel, there are a lot of products to choose from. This means you still need to do some research to find out what the right rotary tool to use is.

#3: Cordless vs. Corded Dremel

We can make a long list of the advantages and disadvantages of each, but the major points to consider are:

Corded Dremel Pros

Corded Dremel 400 High Performance Rotary Tool

Photo by Dremel.com

  • Won’t run out of power
  • More powerful
  • Usually more affordable

Corded Dremel Cons

  • Your movement is limited by cord length
  • Can’t be used outside without an electrical outlet

Cordless Dremel Pros

It's a Cordless Dremel 8050

Photo by Dremel.com

  • Portable
  • Smaller and easier to carry
  • Easy to store

Cordless Dremel Cons

  • Usually more expensive than corded versions
  • Can only be used as long as there’s a battery charge

#4: How Much Power Do You Require?

Rotary tool power is usually measured in horsepower, but in Dremel amps is used instead. The higher the amps the more powerful the Dremel, but overall performance also depends on the other specs.

The power in cordless Dremel tools is measured in volts. The higher the volts the more powerful the tool.

The cordless Dremel 7300 has 4.8 volts while the 8220 has 12 volts so it’s more powerful. The Dremel 100 has 1.15 amps while the Dremel 4300 has 1.8 amps so the 4300 has more power.

#5: RPMs and Speed

Dremel tools come in a variable, one and two-speed designs. Speed is measured in RPMs (revolutions per minute) through a minimum and maximum speeds vary.

The Dremel 4000 series, the Dremel 8220, 8100 and 3000 are variable speed. Other Dremel models are 1 or 2-speeds. Some Dremel tools have a low RPM but make up for it with ha higher amp.

Speed is important but you also need to consider torque, ergonomics and more.

#6: Portability

Portability hinges on the tool’s physical dimensions and weight. If your main concern is portability check out the Dremel 100 and 200. Majority of cordless Dremel all sport compact designs.

Larger Dremel tools are heavier but have more power such as the 8100, 8220, 3000, 4200 and the 4300, so you need to strike a balance between weight and power.

#7: Know Your Dremel

Dremel tools are built for specific purposes. To find out what you need, note all the activities you want to do.

Next, check out the different Dremel models and decide which one fits your needs.

[su_list icon=”icon: arrow-right” icon_color=”#329d40″]
  • Dremel 7300: suitable for light projects, grooming pet nails, grinding and sanding
  • Dremel 9100 Fortiflex: this tool has low speed, high torque, high power. A handpiece and flex shaft are included for detailed carving and engraving.
  • Dremel 200: this is a two-speed rotary tool for new users. It is suitable for precision carving.
  • Dremel 4300: this is a high-end Dremel rotary tool designed for cutting, carving, grinding, sharpening and other tasks.
[/su_list]

These are just some of the many Dremel tools available. These tools are compatible with other Dremel bits and accessories to extend its functionality.

The 4000 and the 4300 can be hooked up with a flex shaft to enhance its functionality. You also do this with smaller Dremel tools.

#8: Dremel Bits and Accessories

Your Dremel tool may come with a couple of accessories or a hundred. Dremel bits are divided into the following:

[su_list icon=”icon: arrow-right” icon_color=”#329d40″]
  • Polishing and Cleaning
  • Grinding & Sharpening
  • Cutting
  • Sanding
  • Carving & Engraving
[/su_list] [su_youtube_advanced url=”https://www.youtube.com/embed/Kv3RR08gkns” controls=”no” rel=”no” modestbranding=”yes” https=”yes”]

Among the most popular accessories are:

[su_list icon=”icon: arrow-right” icon_color=”#329d40″]
  • Cutters and Carvers: for detailed carving and cutting
  • Nylon Bristle Brush: for polishing and cleaning
  • Sanding Discs: for removing corrosion, paint and rust on wood, plastic, metal and other materials
  • Abrasive Discs: this is used for plastics, minerals and other materials
  • Felt Polishing Pads: for polishing different types of materials and surfaces
[/su_list]

#9: Chuck vs. Collet

Some Dremel tools are equipped with a chuck system and others with a collet. These collet and chuck systems have variants.

The most notable difference is the chuck design lets you use all kinds of shanks. A chuck accessory also lets you use it on a Dremel collet rotary tool.

A collet system comes in four sizes, with each collet designed for a specific shank size. If you want to use another shank you’ll need to modify the collet size cover.

[su_youtube_advanced url=”https://www.youtube.com/embed/o6NCUnE-QIA” controls=”no” rel=”no” modestbranding=”yes” https=”yes”]

#10: Bit Changing

Dremel rotary tools use different systems for changing bits. Some don’t need tools, and others necessitate the use of a wrench.

[su_list icon=”icon: arrow-right” icon_color=”#329d40″]
  • Dremel 9100 Forti Flex: uses a 3 jaw lock with wrench change mechanism
  • Dremel 4000: this uses the EZ Twist Nose Cap bit changer
  • Dremel 4200: this is equipped with the EZ Change mechanism
  • Dremel 4300: the 4300 is fitted with the 3 jaw lock system: doesn’t require a collet or tools
[/su_list]

#11: What Accessories Do You Need?

Dremel tools like the 4000 come with several accessories.  You can also purchase all-purpose accessory kits.

Dremel accessories and attachments are not the same. An accessory consists of the bit that is on the chuck or collet.  A Dremel attachment is used for a particular task.

Among the most popular Dremel accessory bits are:

Cleaning & Polishing Accessories:

[su_list icon=”icon: arrow-right” icon_color=”#329d40″]
  • Detail Abrasive Brushes
  • Rubber Polishing Points
  • Abrasive Brushes
  • Brass Brushes
  • Stainless Steel Brushes
  • Bristle and Steel Brushes
  • Polishing Cones
  • Polishing Wheels
[/su_list] [su_youtube_advanced url=”https://www.youtube.com/embed/qqk-zmi-0Oc” controls=”no” rel=”no” modestbranding=”yes” https=”yes”]

Grinding & Sharpening Accessories:

[su_list icon=”icon: arrow-right” icon_color=”#329d40″]
  • Abrasive Point and Abrasive Wheel
  • Sharpening Stone
  • Grinding Wheels
  • Rasps
  • Grit Paper
  • Surface Prep Wheels
  • Dressing Stone
  • Silicon Carbide Grinding Stones
  • Aluminum Oxide Grinding Stones
[/su_list]

Routing & Drilling Accessories:

[su_list icon=”icon: arrow-right” icon_color=”#329d40″]
  • Drill Bits
  • Router Bits
[/su_list] [su_youtube_advanced url=”https://www.youtube.com/embed/BrL93Qp22gY” controls=”no” rel=”no” modestbranding=”yes” https=”yes”]

Etching & Engraving Accessories:

[su_list icon=”icon: arrow-right” icon_color=”#329d40″]
  • Diamond Wheel Points
  • Carbide Engraving Cutters
[/su_list] [su_youtube_advanced url=”https://www.youtube.com/embed/NYUuK2SEcac” controls=”no” rel=”no” modestbranding=”yes” https=”yes”]

Cutting & Scraping Accessories:

[su_list icon=”icon: arrow-right” icon_color=”#329d40″]
  • Tungsten Carbide Cutters
  • High-Speed Tungsten Carbide Cutters
  • Diamond Points
  • High-Speed Carbide Cutters
  • Fiberglass Cut Off Wheels
  • Cut Off Wheels
[/su_list]

Sanding Accessories:

[su_list icon=”icon: arrow-right” icon_color=”#329d40″]
  • Flapwheels
  • Sanding Discs
  • Sanding Bands
  • Sanding Drums
[/su_list]

#12: Consider Dremel Attachments

Some Dremel tools come with several attachments while others only a few or none at all. Keep in mind that some attachments like the flex shaft work only with certain models. If you want to use an attachment make certain it’s included or the rotary tool is compatible with it.

Some of the most useful Dremel attachments are:

[su_list icon=”icon: arrow-right” icon_color=”#329d40″]
  • Dremel 220-01 Rotary Tool Work Station: attachments include a tool holder and drill press. These are for light work only such as thin metal, thin wood and drilling plastic.
  • Dremel 225-01 Flex Shaft Attachment: this consists of a handpiece and a flex shaft. It’s very flexible and provides a good deal of motion essential for engraving and carving.
  • Dremel 575 Right Angle Attachment for Rotary Tool: this attachment converts the rotary tool into a right angle utility. This is a convenient feature for use in making perpendicular cuts and working in tight spots.
  • Dremel 335-01 Plunge Router Attachment: this attachment gives your rotary tool the capabilities of a plunge router. This is useful for shaping plastic and wood edges and smoothing the shape. It’s also good for in letting, hollowing and routing surfaces.
  • Dremel 4486 MultiPro Keyless Chuck: this allows you to change bits without a collet or tools. This is ideal for the 4000.
  • Dremel 2500-01 Rotary Tool Multi-Vise: this attachment is for soft and light materials. You use this to fasten materials so it’s more stable.
  • Dremel 7300 PT Pet Grooming Tool: this is used to trim your pet’s nails. The Dremel 120 Grit Sanding Bands shape your pet’s nails.
  • Dremel A679-02 Attachment Kit for Gardening Tools: this attachment is used to sharpen garden shears, shovels, hoes, tool blades and chainsaws. Dremel grinding bits can also be used as sharpeners.
[/su_list]

#13: Look for Extras

Apart from accessories, bits and attachments, check if the kit has any extras. Some of the more useful are:

[su_list icon=”icon: arrow-right” icon_color=”#329d40″]
  • Battery and charger for cordless Dremel
  • Wrench for changing bits
  • Mandrels
  • Storage case for the rotary tool
  • A case for the accessory bits
[/su_list]

#14: Do You Require Other Accessories?

Some users are worried of buying a Dremel that doesn’t have enough accessories, while others don’t want to end up with bits they won’t need.

You can avoid this situation by making a list of all the functions you need from a Dremel. Use that as your guide when buying. And if you find yourself needing another accessory you can always buy it.

#15: Consider Any Special Requirements You May Need

Are you looking for a specific feature on the Dremel? A pivot light will come in handy if you work in dimly lit areas. A tooless bit changer is convenient if you use work with different bits.

Other features that you may find useful:

[su_list icon=”icon: arrow-right” icon_color=”#329d40″]
  • Replaceable Motor Brushes
  • Ball Bearing Construction
  • Separate Speed Dial And On/Off Switch
  • 360 Degree Grip
  • Electronic Feedback Circuitry
[/su_list]

#16: Extra Batteries

Cordless Dremel rotary tools usually come with one battery. But it’s best to have a spare so you can keep working even if the battery runs out.

#17: An Extension Cord

Corded Dremel tools are powerful, but just like with any corded tool your movement is limited to the cord’s length. Get an extension cord if the cord is impeding your movement.

#18: Matching Tools and Materials

Materials need different speeds, some high and some low. They also require different bits so you have to make sure that Dremel matches the materials you’ll be using.

#19: Skill Level

Get a basic Dremel rotary tool like the Dremel 100 if you’re new to DIY. There’s no need – and no point – getting the Dremel 4000 as you don’t yet have the skills to maximize its power.

[su_youtube_advanced url=”https://www.youtube.com/embed/s7gxCPKo4rM” controls=”no” rel=”no” modestbranding=”yes” https=”yes”]

#20: Ease of Use

Dremel rotary tools are known for their intuitive design. However, some models are easier to use than others. Take a good look at different Dremel rotary tools, taking note of its capabilities and handling as well.

Can’t decide between two Dremel models? Read and compare reviews of the two products and use the feedback as a guide to determine which is the better choice.

The more you use a Dremel the easier the tool becomes to operate. It’s necessary to read about how Dremel tools work, but the only way to be good at it is to use the tool.

[su_youtube_advanced url=”https://www.youtube.com/embed/Yew4E_xNCQA” controls=”no” rel=”no” modestbranding=”yes” https=”yes”]

Final Verdict

With so many products to choose from, deciding which Dremel to buy can be overwhelming. Hopefully, these tips were able to help you decide which of their products is the right one.

Featured Image by Gareth Halfacree/ CC BY

How to Use Dremel 200 – Step by Step Guide

Dremel 200 Series Rotary Tool

Photo by Dremel.com

The Dremel 200 is an electric rotary tool designed for light tasks. This compact tool is suitable for carving, routing, small DIY projects, arts and crafts. While the Dremel 200 is light, it’s still a versatile tool provided it’s handled the correct way.

General Steps for Preparing a Dremel Rotary Tool

  1. Wear safety gear: Put on rubber gloves and safety goggles. Keep your work environment clean.
  1. Insert the required bit: Choose the right bit and insert it at the end of the tool. Fasten the bit doesn’t move around.
    To take out a bit, press the shaft lock button down and rotate the collet.

    • If you’re new to Dremel tools, make sure the device is off when you practice inserting and removing bits.
    • The bit changing system may vary with other Dremel tools.


  1. Ensure your Dremel is turned off before plugging it in: Once the right bit is in place, turn the Dremel on to the lowest setting. Adjust the speed as needed for the project you’re on.
  1. Clean the Dremel after every use: When you’re done, turn the Dremel off and remove the bit. Wipe the tool with a clean cloth.

How to Cut with a Dremel Rotary Tool

  1. Insert the cutting bit or attachment. The cutting bit is best suited for small cuts, not lengthy curves.
  2. Fasten the object. Use clamps or vise to secure it. Do not use your hands.
  3. Select the speed and start cutting. Refer to your owner’s manual for the right speed for the bit and material you’re cutting. Some tips:
    • Make several passes if you’re cutting thick materials.
    • Your speed is too fast if there’s discoloration or smoke.
    • If the motor slows or drops, you’re applying too much pressure. Reduce the pressure and speed.
    • If you’re cutting plastic use a flat saw blade or other bits proven to cut plastic.
    • Draw cut outlines on the material you’re cutting as it may help with the cutting process.
    • If you’re cutting metal be certain that it’s fixed securely.
    • It’s normal to see sparks fly when you cut metal with a Dremel.


How to Polish, Sand and Grind with a Dremel 200

Grinding:

  • To grind with your Dremel, secure grinding stones on the shaft or mandrel.
  • Slide the stone in front of the Dremel and make sure it’s tight.
  • Turn the rotary tool on.
  • Choose a low setting and start grinding.
  • Hold the stone against whatever you’re cutting. Increase the setting if you’re not getting the desired results.
  • Carbide bits are the most effective for ceramic, porcelain and metal. Triangular and cylindrical bits are ideal for round grinds.
  • Use a flat disc shape for interior corner grinding and notch grinding.
  • Aside from grinding stones you can use abrasive wheels or chainsaw sharpening stones.

Sanding, Polishing and Sharpening:

Photo by Dremel.com

  • Choose a sandpaper bit. Secure it on the rotary tool.
  • Secure the screw along the sandpaper bit end.
  • Turn your Dremel tool on.
  • Choose a low – or the lowest – setting if you’re polishing wood or plastic.
  • Choose a high setting if you’re polishing metal.
  • Secure the material and set the Dremel bit across the material. This ensures the sandpaper bit and material makes full contact.
  • Ensure the sanding bits are in good condition, otherwise, it’s going to leave marks on the material. The bit needs to fit the Dremel.
  • You can also use shaping wheels, flap wheels, sanding discs and sanding bands to add detail.
  • If you’re working on a large project, commence with coarse bits before proceeding to other bits. The course to soft bits approach makes it easy to go over large areas. Do not start with soft bits as it’ll take longer.

How to Polish Plastics and Metals

The process is similar to using other Dremel bits:

  • Insert a polishing felt tip or wheel on your Dremel.
  • Apply a polishing compound over the object you want to polish.
  • Start at low speed and work your way up only if necessary.
  • You don’t need to use a compound to polish, but it does make the finished object look shiny.
  • Always use the appropriate polishing brushes, felt polishing wheels, rubber polishing points and similar bits.

Tips and Warnings

  • Dremel tools are compatible with other Dremel bits and accessories. This compatibility level allows you to extend your tool’s functionality.
  • Practice before doing any actual work.
  • Always wear gloves to protect your hands.
  • Wear ear plugs if you’re using the Dremel at high settings.
  • Don’t use Dremel bits for stuff it’s not intended for.

Final Words

The information above is a general guide for Dremel rotary tools. Please read your owner’s manual for other details.

Featured Image by Dremel.com

Top 19 Tool Blogs Every Tool Lovers Should Follow

Top 19 Tool Blogs Every Tool Lovers Should FollowWe all have been victims of floods of words without meaning when searching for crucial information online. Most people find it easy to fill their sites with unnecessary junk in the name of content. Some website or blog owners are just hungry for traffic and will publish anything to get what they want. Don’t tell me how good your product is, but tell me how good it will make me.

As an expert in the tools industry, my pride is to help you get the best tools that will help you carry out your projects with accuracy and precision. This will rescue internet users and potential online buyers from experiencing this drawback.

We have done the research part for you and therefore present you with top 19 tool blogs that you should follow if you are a tools enthusiast.

Note: The following are our top recommended tools blogs arranged in no particular order

[top_list]

Pro Tool Reviews

https://www.protoolreviews.com

Pro Tool Review


There are many tool websites but Pro Tool Reviews stand out. I would call it a home for tools. This site provides you with some of the latest tools and accessories from top manufacturers. You can get a wide range of power and hand tools for metalworking, woodworking and automotive among others. They pride in provide honest product reviews and other informational contents to help you get a deeper understanding when it comes to handling the tools.

[/top_list] [top_list]

Cop Tool

http://www.coptool.com

The authors (Ohio Power Tool and professional tool users) of Cop Tool provide personal opinions in regards to the products. This involves field testing and the feedback they get from the experts in that sector. They provide detailed and professional product reviews for both Ohio Power Tools as well as those products that are not produced by the company. This easy to navigate blog has over 30 categories covering all types of tools from different brands.

[/top_list] [top_list]

Tool Guyd

http://toolguyd.com

Tool Guyd

Tool Guyd is a blog whose main aim is to provide readers with relevant information regarding tools so that it is easy to choose the most suitable tool. They focus on new tool previews, tools guides, DIY projects and hands-on reviews. This blog was founded in 2008 by Stuart Deutsch who has a passion for woodworking, robotics, electronics and DIY projects. They cover all types of tools ranging from power tools to hand tools from different manufacturers.

[/top_list] [top_list]

Tools In Action

http://toolsinaction.com

Tools In Action

The main objective of Tools In Action is to provide homeowners and professionals with helpful information regarding power tools so that it is easy to make the right purchase. This blog started in 20005 with the name Professional Power Tool Guide. They specialize in power tools as well as outdoor power equipment reviews. They engage their audience with guide and videos from their website as well as social media platforms.

[/top_list] [top_list]

Tool Box Buzz

http://www.toolboxbuzz.com

Tool Box Buzz

Tool Box Buzz is a website that provides all information regarding tools to tool enthusiasts. This includes product reviews, news, guides and any other relevant information. Their main objective is to equip DIY lovers, hobbyists, and professionals with the right information regarding the best tools and brands so that they can choose quality tools that suit your requirement. They allow contributors with different experiences with tools to provide diversified information and this makes their blog credible to all types of users.

[/top_list] [top_list]

Cool Tools

http://kk.org/cooltools

Cool Tools

Cool Tools is a website that gives recommendations to the most affordable tools available on the market. They provide all reviews for hand tools, gadgets, software, books, ideas, maps and much more. They do not sell any product. Their main aim is to provide readers with positive reviews, prices and the best places to buy the products. Their tools reviews are written by actual users who have used the products. Because they want to give you the best recommendations, they do not focus on negative reviews.

[/top_list] [top_list]

Bridge City Tools

http://www.bridgecitytools.com/blog

Bridge City Tools

Bridge City Tools is one of the oldest tools websites started in 1983 by John Economaki. They have been producing quality tools for collectors and woodworkers and also run their own blog. Apart from tools, they also provide other products like gift certificates, books, and other cool stuff. Being an American based company, they produce quality tools in limited quantity. This means that they produce many of the tools that have been sold before the beginning of production.

[/top_list] [top_list]

Harbor Freight

http://blog.harborfreight.com

Harbor Freight

Harbor Freight prides in giving customers with high-quality tools. It has been there for the last 35 years providing over 7000 tools and other accessories at very affordable prices. They do not produce the tool. Instead, they buy them directly from the manufacturers and sell them to users at affordable prices. They test the tools to ensure that they meet professional standards, toughness 100 percent satisfaction guarantee. They have over 800 stores and earned over 40 million customers who are satisfied with their products.

[/top_list] [top_list]

Fine Wood Working

http://www.finewoodworking.com

Fine Wood Working

Paul Roman, a woodworking enthusiast started Fine Wood Working blog together with his wife. The blog has been there for the last 40 years. Their main aim is to provide users with high quality and valuable information to people who love craft and coming up with beautiful; furniture. They are also known for their top magazines like Fine Wood Working, Fine cooking, Fine Homebuilding, and Fine Gardening. They also provide projects and plans, how to contents, tools and materials and other resourceful videos.

[/top_list] [top_list]

Acme Tools

http://www.acmetools.com/blog

Acme Tools

Acme Tools is a blog that helps handymen to do their work best by proving honest reviews of different tools. They cover tools that are ideal for DIY enthusiasts and those suited for professionals. They also provide resourceful information that help tool lovers select the best tools that match their needs. They provide over 400 brands with different categories that you can choose.

[/top_list] [top_list]

Tool Barn

http://blogs.toolbarn.com

Tool Barn

Tool Barn is a simple blog that is easy to navigate. They provide resourceful information on how to do repairs, informative videos and much more. The blog provides you with different categories where you can choose the most relevant to your needs. They also provide more information about tools through their social media platforms.

[/top_list] [top_list]

Kms Tools

https://www.kmstools.com/blog

Kms Tools

Kms Tools is a one collection blog that provides reviews of a wide range of tools. It is a top tools blog today that help tools lovers get what they want. They cover air tools, hand tools, metalworking tools, woodworking tools and much more. Apart from providing users with tools review, they also write resource contents that help users to learn more details about buying, using and handling various tools.

[/top_list] [top_list]

Infinity Tools

https://www.infinitytools.com/blog/hand-tools

Infinity Tools

Infinity Tools is a popular blog worldwide that provides top-notch woodworking tools. They deal with tools like shaper cutters, router bits, insert tooling, shaping, sawing and other woodworking tools. They get their tools from both local and global manufacturers and sell them at reasonable prices. With their high-quality tools, they have over 10,000 happy customers. They top the game when it comes to high-performance tools and unbeatable value.

[/top_list] [top_list]

Power Tool World

http://www.powertoolworld.co.uk

Power Tool World

Power Tool World provides very simple reviews for power tools, batteries, and other accessories. The blog was started in 1998 as a family owned business and it has become the largest tools distributor in the UK. They only review products from the top brands to ensure that you get quality tools to handle different tasks. The tools also come at competitive prices and they also deliver at your doorstep.

[/top_list] [top_list]

Tool Nut

https://www.toolnut.com/blog

Tool Nut

If you are searching for power tools, hand tools, and accessories, then you should visit Tool Nut for the best deals. This is a family operated business that started in 1994. Purchase from them and they will treat you like family. Their objective is to provide users with the best tools and accessories. They are well known for their effective customer support and quality products. They review top tools from the best brands on the market.

[/top_list] [top_list]

Home Fixated

https://homefixated.com

Home Fixated

DIY lovers and professionals who love home improvement projects will find Home Fixated blog very resourceful. The aim of this blog is to provide tool reviews, construction tips, how to contents, news and any other relevant information. Other resources that they provide include gardening and real estate. Their posts are simple and interesting to read. They allow contributors to their blog and this provides readers with diversified information hence attracting a large audience.

[/top_list] [top_list]

Norse Wood Smith

http://www.norsewoodsmith.com

Norse Wood Smith

If you are a woodworker in search of a wide range of hand tools to help you do your work best, Norse Wood Smith is a blog to visit. They recommend different types of woodworking tools from their online store which is safe, secure and powered by Amazon. They have also gathered other best woodworking blogs when you can get more tools review.

[/top_list] [top_list]

iQ Power Tools

https://iqpowertools.com/blog

iQ Power Tools

Any woodworker or masonry contractor will tell you that dust is a big enemy in their work. This is why Joel and Paul Guth stated iQ Power Tools to solve the problem. As Masons, they discovered that dust affects many contractors and they came up with smart power tools that eliminate dust during work. If you want to enjoy a clean work environment without any dust, visit their blog to find more details about their best masonry power tools remove dust. With their tools, you can cut through concrete without dust.

[/top_list] [top_list]

My Fix It Up Life

http://myfixituplife.com

My Fix It Up Life

My Fix It Up Life is a fun blog with fun videos, talk shows, different tools reviews and informative contents. They provide top recommendations for the best tools that are affordable and durable. Their product reviews are precise and interesting to read. They also blog about their projects, family and much more. You can also find good news about home improvement or remodeling. Visit their blog and you will enjoy reading their posts.

[/top_list]

When you are looking for the best tools online, you can hardly exhaust all the information provided on different websites. Plus, finding the best blog with enough resources is also tough. This is why my team and I compiled a list of top tools blog that you should visit if you are looking forward to purchasing quality tools or getting other useful resources. From the list of the above blogs, be sure to find one that will interest you. You will, therefore, spend less time jumping from one tool website to the other looking for the tools that you need.